File Menu
| Open Batch | Select and Open a batch. |
| Open Recent | Open a recent Spitfire document to which an image was attached. If you used the Inquiry option or attached an image to a Pay Request, you could open the AP Scan or Pay Request document from the Open Recent option. The Batch Viewer remembers up to eight recent documents. This list is cleared when the Batch Viewer is closed. |
| Create Pay Request | Open the Attach to Document dialog box. |
| Process AP | Process the displayed image to Microsoft Dynamics SL AP Voucher and Adjustment Entry. |
| Process CN | Process the displayed image in Microsoft Dynamics SL Contract Management Payment Request Entry. |
| Research | Open the Invoice Inquiry dialog box. |
View Menu
| First, Prior, Next, Last | Go to the first, prior, next, or last image file in the batch. |
| Pick from List… | Select an image file from the batch. |
| Thumbnails | Show thumbnails of the previous and next two image files on the side of the Batch Viewer. |
| Data | Display information about the image. |
The Pick from List… option allows you to quickly find any image file in the batch.
To find an image file from the batch:
- Select View | Pick from List… A Pick Image window will open. Click and drag the lower, right-hand corner to enlarge the Preview window.
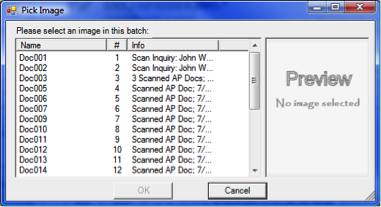
- Scroll through the list to find the image file.
- When found, click the file Name. The image will appear in the Preview pane.
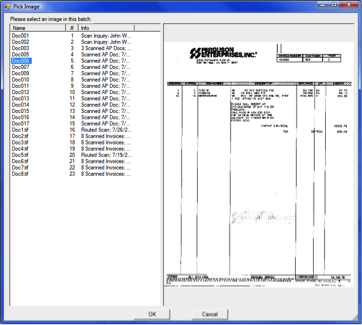
- Click OK The image file will appear in the Batch Viewer window.
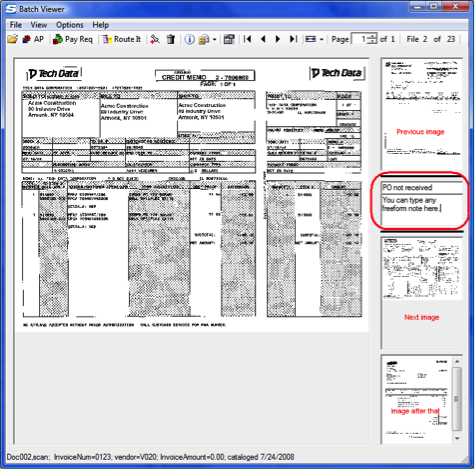
Thumbnails
When you choose to show thumbnails, a side panel on the Batch Viewer displays thumbnail pictures of the previous image and the next two images. It also provides Inquiry/Note fields similar to those on the Route for Inquiry dialog box.
The top inquiry field is meant for a short one-line note.
The bottom note field allows you type a longer, freeform note. Together these fields will populate the Remarks field on a Spitfire document if you attach this image to a document.
The Inquiry/Notes fields will not store information in the Batch Viewer itself. Once you move on to another image, the fields will clear.
Options Menu
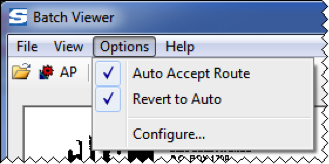
| Auto Accept Route | Set the route to Auto Accept or Manual. |
| Revert to Auto | If Auto Accept Route is selected, and the user changes the route mode to manual for one document, this option will automatically revert the route mode to Auto Accept Route for the next image. If not selected, does not automatically reset the mode to Auto Accept Route once Manual Route mode is selected. |
| Configure.. | Open the Configure dialog box for the Batch Viewer. |
The Configuration dialog box stores the Batch Viewer settings.
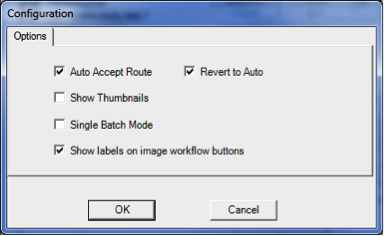
| Auto Accept Route | Set the document route mode to Auto Accept. This will default the Auto Accept Route choice on the Options menu and the toolbar. |
| Revert to Auto | Set the default Revert to Auto status on the Options menu. |
| Show Thumbnails | Open a panel on the right side of the viewer with thumbnails on the images. |
| Single Batch Mode | Limit the contents of the Batch Viewer to the files attached to the Spitfire document in your Inbox where you clicked the yellow processing arrow. Note: Changes to this option require you to close the Batch Viewer and reopen it. |
| Show labels on image workflow buttons | Add label to some toolbar buttons. |
Auto Accept vs. Manual Route Mode
You can set and quickly change the route mode for Spitfire documents created during your Batch Viewer workflow. The route mode determines how the Spitfire documents will start their routes. In all cases, sfPMS will expect to use a predefined route (as established on the Manage Dashboard).
While Auto Accept Route mode is on, documents will start their routes with the Seq 2 routees defined on the automated route. These documents will not be included in your Inbox.
While Manual Route mode is on, documents will remain at Seq 1 and appear on your Inbox until you manually send the document to the next routee. Also, the document will open when it is created during the workflow.
The icon appearing on the toolbar tells you which mode is currently active.