In order to create a Vendor Pay Request, the corresponding Vendor Commitment must have a Status of Committed.
There are two ways to create a Vendor Pay Request:
- From a Vendor Commitment – use this method from a specific Vendor Commitment document and are ready to create a Vendor Pay Request.
- From the Project Dashboard – use this method at any point to create a Vendor Pay Request for any Vendor Commitment.
To create a Vendor Pay Request from a Vendor Commitment:
- From the Project Dashboard, select Vendor Commitment from the Documents list.
- Locate the necessary Vendor Commitment and click Open.
- From the Actions and Options menu, click Create Pay Request.
- Continue from step 3 of the instructions below.
To create a Vendor Pay Request from the Project Dashboard:
- From the Project Dashboard, select Vendor Pay Request from the Documents list, and click Add.
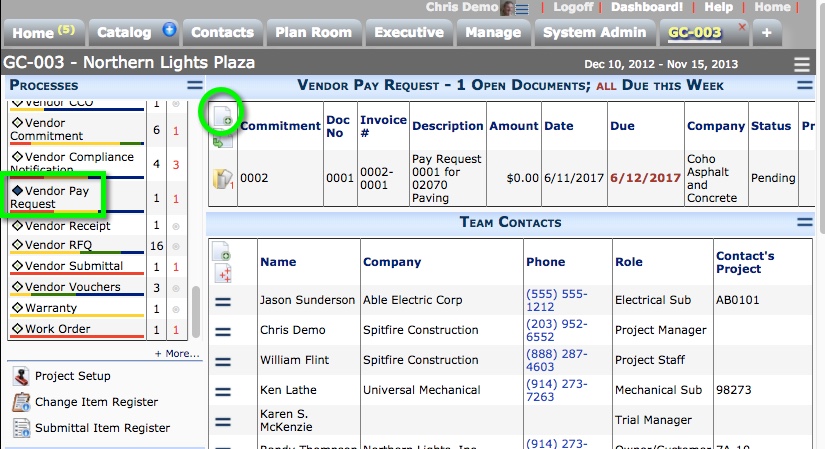
- In Commitment, enter or lookup the Vendor Commitment associated with this Vendor Pay Request.
- In Invoice #, enter the corresponding invoice number.
- In the four Dates fields, enter the appropriate dates.
- (optional) In CCO, enter or lookup the related information.
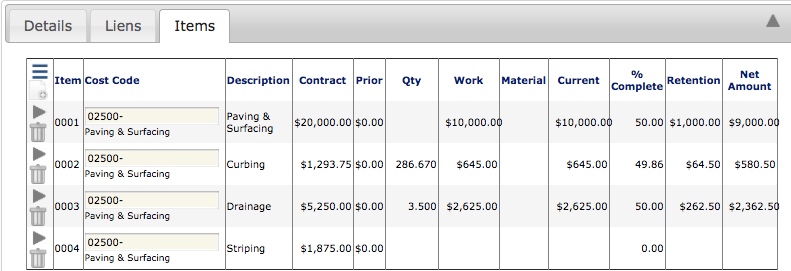
- Save the document. Information from the Vendor Commitment will appear on the Items tab.
- On the Items tab, complete Qty, Work, Material, % Complete as needed.
- Note the information on the Details tab.
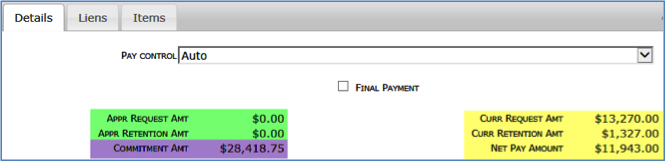
The Green fields are the sum of all approved Vendor Pay Requests, the Purple field is the total Vendor Commitment amount, and the Yellow fields are the sum of the Vendor Pay Request’s line items.
Indicate a final payment by clicking Final Payment. - (optional) On the Liens tab, add the necessary items.
- Add attachments (ex: a scanned version of the subcontractor’s invoice) and create a route if needed.
- Either route the document to another user or Save and Close.
You can reopen the document and change its Status when necessary.
To approve a Vendor Pay Request:
- Locate and open the Vendor Pay Request.
- Complete Invoice # if empty.
- Enter or select an Invoice Date.
- In Approved By, enter or lookup the corresponding user.
- Change Status to Approved.
- Save the document.
Note: If you site is integrated with Microsoft Dynamics SL, Approved Vendor Pay Requests appear in the Microsoft Dynamics SL Subcontract Payment Review and Approval screen, ready to be posted, and to generate a Microsoft Dynamics SL AP Voucher for payment. If your site is integrated with Acumatica, Approved Pay Requests generate one or more AP Vouchers.
Releasing Retention
Integrated Site
If your site is integrated with an accounting system, you do not need to release retention in sfPMS.
To release retention on the Vendor Pay Request:
- Create a new Vendor Pay Request for the Vendor Commitment and (optionally) include Release Retention in the Description field.
- If appropriate, click Final Payment on the Details tab.
- On the Items tab, enter 0 (zero) in Current for each item or leave them blank.
- On the Route Detail tab, enter a routing note that AP should release a specific amount of retention.
- Save, route, and approve the Vendor Pay Request as you normally would.
Non-integrated Sites
To release retention of the Vendor Pay Request:
- Create a new Vendor Pay Request for the Vendor Commitment and (optionally) include Release Retention in the Description field.
- If appropriate, click Final Payment on the Details tab.
- On the Items tab, click Expand.
- In Curr Retention, enter the retention amount you want to release as a negative number.
- Return to Grid view. You will notice the Net Amount for this Items accurately reflects the amount you will pay (ie, the retention you will be releasing).
- Save, route, and approve the Vendor Pay Request as usual.
Statuses for Vendor Pay Requests
At first the Status drop-down menu offers: In Process, Canceled.
After you save the document: In Process, Approved, Canceled, Pending.
Once you set the Status to Pending and save the document, you cannot add or edit the Vendor Pay Request. You must change the Status to In Process to edit the document.
Canceled and Approved are final statuses, and the document cannot be edited.
If the Pay Request is Approved and your site is integrated with Microsoft Dynamics SL, the Vendor Pay Request appears in the Microsoft Dynamics SL Subcontract Payment Review and Approval screen, ready to be posted, and to generate a Microsoft Dynamics SL AP Voucher for payment. If your site is integrated with Acumatica, Approved Pay Requests generate one or more AP Vouchers in Acumatica.