
Summary:
You can use the PresetSearch rules to add a named search to the Catalog Dashboard tab, from where users will be able to select it.
Note: if, after using the PresetSearch rules to set up the tab, you want to have the tab always appear on the dashboard, add the PersistentTabs rule (available in V2021+).
Tips for the PresetSearch Rules
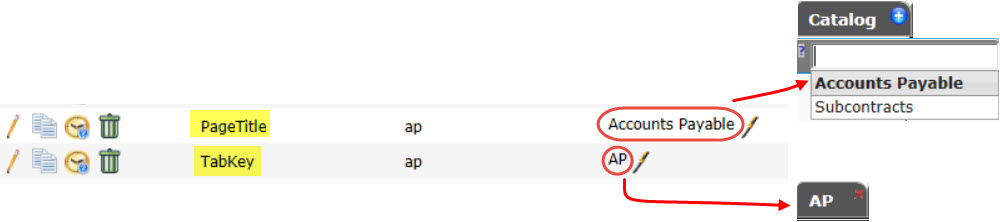
- Make up a filter value. This code (ap in the example below) will be used on all the PresetSearch rules that apply to your new named search.
- Start with the PageTitle rule to indicate what will appear as the title of the named search page and also on the Catalog drop-down.
- Add a TabKey rule to add a new tab for the named search.
- Enable either the Documents or the Files rule (or both, if desired).
- Enable the AutoSearch rule.
- Add whatever other PresetSearch rules you want, especially the Lock rule if you want to limit the filters that show up.
- When you have added all the appropriate rules, save!
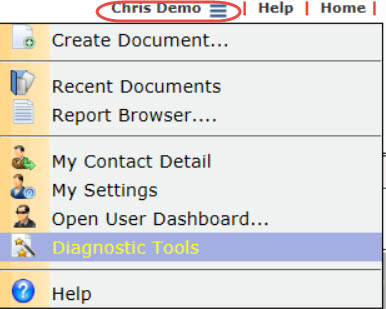
- Select Diagnostics Tools from your name menu:
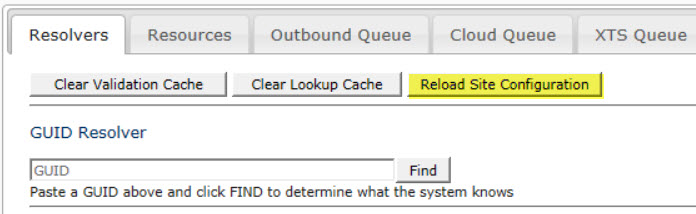
- Click the Reload Site Configuration button on the Resolvers tab.
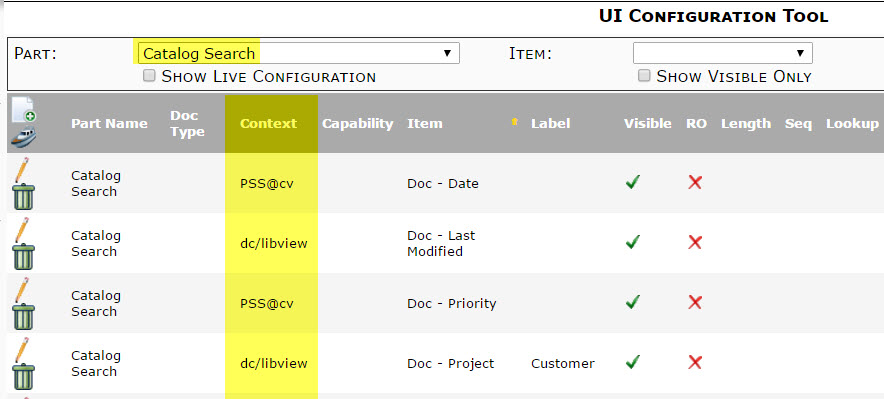
- Now that you have a tab, you may need to go to the UI Configuration tool to change the columns that you want to appear in this new tab. You would configure the Catalog Search part and select the new tab as the Context for each column that you are modifying.
SiteConfig.xml File (prior to V2021)
You can add a tab to the system to open your custom catalog search by adding a block like the one below to your SiteConfig.XML file (using the Tools | Edit option in ICTool). Values in magenta are user specified. Values in orange are seldom changed. Black bold values are required.
<TabInfo>
<PageName>Desktop</PageName>
<TabBarName>Banner</TabBarName>
<TabID>922</TabID>
<TabName>View</TabName>
<TabOrder>111</TabOrder>
<Roles>LibView.aspx</Roles>
<Url>~/dcmodules/libview.aspx?set=cv</Url>
<Tip>Custom Library</Tip>
</TabInfo>
- TabID must be unique. Use a value over 900.
- Tab Order specifies location. Your tab will be relative to the distributed tabs:
- 010 – Home Tab
- 020 – Catalog
- 030 – Contacts
- 120 – Plan Room
- 130 – Executive
- 140 – Manage
- 170 – System Admin
- Tab Name is the visible label on the tab.
- Roles can control when/for whom the tab is visible. You actually specify the internal name of a system capability here, not the name of one of your roles. For example, use LibView.aspx to default visibility to match the standard catalog page.
- * for all users to have the tab
- cuManager.aspx to mimic the Manager dashboard
- or any of the 48 distributed UCNames in xsfUCFunction with UCModule=PAGE
- or a custom UCName added to xsfUCFunction with UCModule=PAGE (see Additional Comments below)
- URL is the resource opened. You would specify the set ID after the equal sign and create a set of filtered rules to match. Generally, the user also needs a role with the capability to access this URL: in this example PAGE | Catalog Dashboard.
- Tip is the tab‘s tool tip.
Additional Comments:
You can define a custom capability using a SQL command such as
INSERT INTO dbo.xsfUCFunction
 VALUES(newid(),'PAGE','czContractsTab',1,'Allow','NA',
 'Can access custom Contracts tab')
The custom UCName in the example is czContractsTab. You could use anything starting with cz, and then use this in your TabInfo Roles field. Be sure to use the System Admin Roles Maintenance tool to assign this new capability to one or more of your system roles.
KBA-01598; Last updated: April 15, 2025 at 9:11 am
Keywords: creating a tab, custom tab