Once you have all your scanned images/invoices as TIF files or image-based PDF files, you use the Batch Upload Tool to process these files and load the information into sfPMS.
- This process will create a Spitfire File Batch document with each of the scanned files attached to the document.
- The File Batch document will then be routed according to the predefined route for the Doc Type.
- The user who receives the File Batch document in his/her Inbox will be able to process the images through the Spitfire Batch Viewer.
To open the Batch Upload Tool:
- (optional) We recommend you log into Spitfire before starting the Batch Upload Tool. If you do, the Batch Upload Tool will self update and use the dashboard to determine the destination site.
- Assuming the Batch Upload Tool was installed, open it now.
If this is the first time you are using the Batch Upload Tool, the Configuration window will open.
Batch Upload Tool Configuration
The first time you open the Batch Upload Tool the Configuration window will automatically appear. You need to configure the Batch Upload Tool before you can use it.
Once you fill out the Configuration tabs and click OK, the Batch Upload Tool will open.
Source Tab

The Source tab points to the location of your TIF image files on your computer/network.
| Location | Enter the path to the images (top level folder) on your C: drive, or browse to the folder. |
| Mask | (optional) Enter a mask for your scanned image files. TIF is the only supported file format. Wildcards are allowed. |
| Copy Local | Check to indicate that your image files are on the network and you’d like to copy the files to your local drive before processing. |
| Default Pages For Document | Enter or select 0 if you scan each invoice separately, enter or select 1 if scanning 1-page invoices, enter or select 2 if scanning 2-page invoices, etc. |
Folders Tab
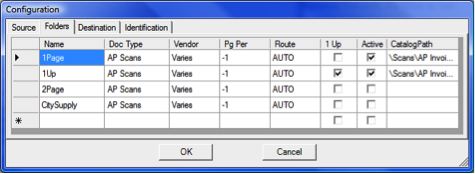
The Folders tab provides the functionality allowing you to:
• upload files from multiple folders
• route the created File Batch document through a predefined route
Note: Projects are not known by the Batch Upload Tool; therefore, the selected route cannot resolve roles from a Project Dashboard. The predefined route created for File Batch documents should contain specific Contacts or non-specific roles, such as Doc Entered By.
• Upload the scanned image files to a specific Spitfire Catalog folder.
• Create one Spitfire document per scanned file or create one Spitfire document will all the scanned files attached.
• Upload PDF files instead of TIF files. (You need a folder with Pg Per= 99)
When you indicate the Location of your top-level folder on the Source tab, any folders nested in your top-level folder will automatically populate the rows in the Folders tab. Edit the default information in these rows to match your needs.
| Name | (optional) Enter or edit the name of the folder where your .TIF image files are located on your computer. |
| Doc Type | Defaults to File Batch, the most commonly-used Spitfire Doc Type in Batch Scanning. Select a different Doc Type (ex: Scanned Timecards) if appropriate. |
| Vendor | The default, Varies, does not pass Vendor ID to Microsoft Dynamics SL. Enter the Vendor ID if your folder is for a specific Vendor. |
| PgPer | Defaults to -1, which refers to the setting entered on the Source Tab. Enter 1 to indicate that each page in the image file should be loaded to Spitfire as a separate file, 2 to indicate that every 2 pages should be loaded into Spitfire as a separate file, etc. For example, a 50-page scan file could create 50 1-page files or 25 2-page files in Spitfire. Enter 99 for the folder that holds files with one-invoice per scan. |
| Route | The default, AUTO, allows the system to ise the standard route determination process to find automated routes that you have set up for File Batch (or other) documents. Enter the name of a specific predefined route here to override the standard process and select a specific route. |
| 1 Up | Check this option if you’d like to create a new Spitfire document for each scanned image in the uploaded file. For example: an uploaded file may contain 50 1-page invoices. With 1 Up selected, 50 Spitfire documents each with one image file attachment will be created. If 1 Up is not selected (clear), then one Spitfire document with 50 image file attachments will be created. |
| Active | Check this option if you want this row to be considered in the next Batch Upload Tool process. If not selected, this row will be skipped. |
| CatalogPath | Enter the Spitfire Catalog folder (including path from the Catalog root) to which the image files processed from this row will be uploaded, for example, \Scans\AP Invoices. The \ is required to designate a folder below the root (all items) folder. Note: Be sure the user has access rights to the designated folder. |
Destination Tab
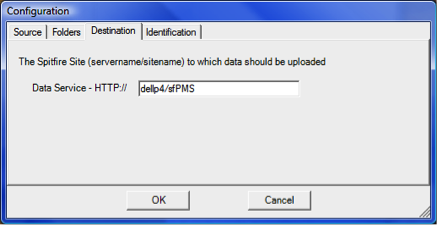
The Destination tab points to the location of your Spitfire software on your IIS server.
| Data Service – HTTP:// | Enter your IIS Servers’ HTTP HostName followed by the Application Root configured within IIS for sfPMS, for example: spitfire/sfPMS spitfire/test |
Note: If you open the Batch Upload Tool while you are logged into a Spitfire Dashboard, that dashboard will be used as the destination, overriding whatever is in this tab.
Identification Tab
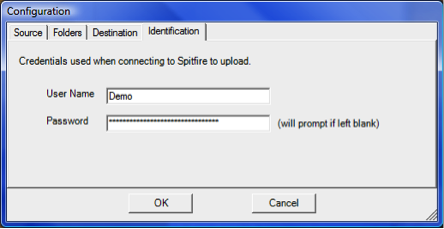
The Identification tab identifies the Spitfire user uploading the batches.
| User Name | Enter the user name of the Spitfire user who uploads the batch image files. |
| Password | Enter the user’s password. |
Note: If the password is not entered, the user will be prompted to enter it before processing.
Using the Batch Upload Tool
The Batch Upload Tool is configured to located TIF files or image-based PDF files of scanned images. As it processes files, it can separate pages into separate invoices (as long as you scan single and double page invoices separately.

To process the scanned images, click Configure.
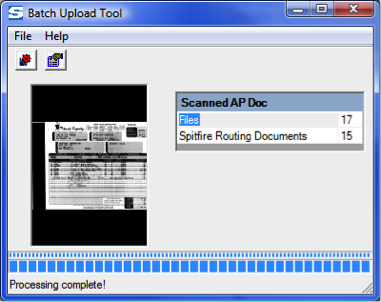
When the Batch Upload Tool has finished processing, it will look like the image below, indicating the number of scanned image files and Spitfire documents that have been created.
To reconfigure the Batch Upload Tool, click the icon on the right and change any of the information in the tabs.
The person established by the automated route for AP Scan uploads will receive the images in the Spitfire Inbox and will be able to process them through the Batch Viewer.