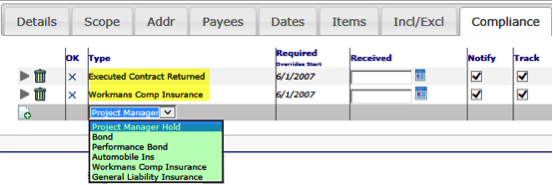
A Compliance type defines the type of compliance requirement needed in your project (ex: General Liability Insurance, Workman’s Comp Insurance, etc.). Compliance types can be set up as required or optional for specific Doc Types. You can edit default Compliance types and create new ones. These Compliance types show up on the Compliance tab of your document.

Compliance types are created and edited through the Compliance Types too.
The Compliance Types tool is found on the System Admin Dashboard and the Manage Dashboard. For complete information regarding the Compliance Types tool, see the System Administrator Focus Guide.
To edit an existing Compliance Type:
- On the System Admin Dashboard click Compliance Types.
- Use the filter to find the Compliance type you want to edit.
- Click View Compliance Mapping on the Compliance type row.
- Click Change Map Information to edit the fields.
- Accept your changes.
Mapping Compliance Types to Doc Types
You need to indicate which Compliance types are required and available for which Doc Types. You do this by mapping each desired Compliance type to one or more Doc Types.
To map a Compliance Type to a Doc Type:
- On the System Admin Dashboard click Compliance Types.
- Use the filter to find the Compliance type you want to edit.
- Click View Compliance Mapping on the Compliance type row.
- In the Mappings area, select a Doc Type from the drop-down list or leave blank to indicate the Compliance type should apply to all Doc Types.
- Click Add a New Compliance Mapping.
- (optional) If the Doc Type you selected has subtypes, select a Sub Type from the drop-down list or leave blank to indicate the Compliance type should apply to all subtypes.
- (optional) If the Compliance type is to be optional on the Doc Type + subtype, clear the Reqd checkbox. Required Compliance types appear on the document’s Compliance tab when the document is first created; optional Compliance types can be added to the document through the Compliance tab.
- Accept the row.
- Save the mapping.
To create a new Compliance type:
- On the System Admin Dashboard click Compliance Types.
- From the top of the list, click Add a row.
- In Compliance Name, type a descriptive name for the Compliance type.
- Complete the remaining fields as needed.
- Accept the row.
- Save your changes.
Automatic Workflow
There is automatic workflow for the Compliance type. The commands in the automatic workflow tell sfPMS what to do whenever a Compliance requirement is out of compliance.
It is possible to replace the Spitfire-generated workflow script with one of your own. For more information, see the “Compliance Type” chapter of the System Administration Focus Guide.