Adding Drop-down fields and Tabs to Doc Types
Once you have prepared your subtypes to be used on Commitment and Vendor documents, you need to make sure these subtypes appear on the appropriate drop-down lists on your documents. If you want to set Pay Control on the Commitment level, you need to add the Pay Control drop-down list to the Commitment’s Detail tab, and if you want to track lien waivers on your Pay Requests, you need to add the Compliance tab to your Pay Request Doc Type. Drop-down fields and Compliance tabs are controlled through the Customization tool.
UI Configuration Tool
The UI Configuration tool is found on the System Admin Dashboard. For complete information regarding this customization tool, see the System Administration Focus Guide.
Customizing Doc Types
Vendor Documents
To edit the subtype drop-down menu on the Vendor Doc Type:
- On the System Admin dashboard, select UI Configuration.
- From the Doc Type drop-down list, select Vendor.
- From the Part drop-down list, select Doc Detail – Standard.
- From the Item drop-down list, select Specific Type.
- Select the Show Live Configuration checkbox. By default the Vendor Doc Type shows the Specific Type item. This is the drop-down offering your commitment subtype options. If you prefer the label “Type,” you do not need to change anything.

- Click Copy and edit this Configuration item to copy the Doc Detail Standard | Specific Item row.
- In Label, enter new text for the subtype field’s label.
- Make sure both Visible and Active are selected.
- Accept the row.
- Save your changes.
Commitment Documents
To edit the subtype drop-down menu on the Commitment Doc Type:
- On the System Admin dashboard, select UI Configuration.
- From the Doc Type drop-down list, select Vendor Commitment.
- From the Part drop-down list, select Doc Header – Commitment.
- From the Item drop-down list, select Commitment Type.
- Select the Show Live Configuration checkbox. By default the Commitment Doc Type shows the Commitment Type item. This is the drop-down offering your commitment subtype options. If you prefer the label “Commitment Type,” you do not need to change anything.

- Click Copy and edit this Configuration item to add your own label for the commitment drop-down list.
- In Label enter the new text text for the subtype field’s label.
- Make sure both Visible and Active are selected.
- Accept the row.
- Save your changes.
To make the Pay Control drop-down list visible on the Commitment Doc Type:
- On the System Admin dashboard, select UI Configuration.
- From the Doc Type drop-down list, select Vendor Commitment.
- From the Part drop-down list, select Doc Header – Standard.
- From the Item drop-down list, select Pay Control.
- Select the Show Live Configuration checkbox.
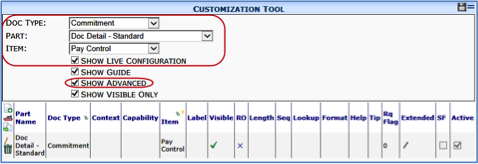
- Click Copy and edit this Configuration item to copy the Doc Detail – Standard | Pay Control row.
- Make sure both Visible and Active are selected.
- Accept the row.
- Save your changes.
Pay Request Documents
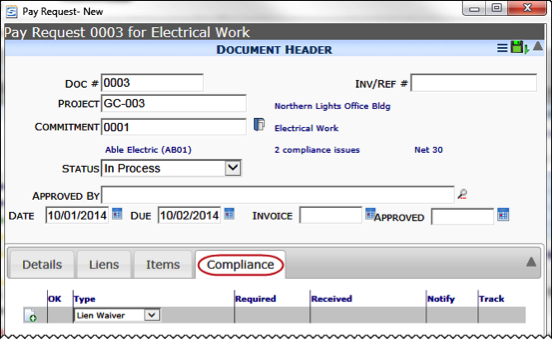
To add a Compliance tab to Pay Requests:
- On the System Admin dashboard, select UI Configuration.
- From the Doc Type drop-down list, select Pay Request.
- From the Part drop-down list, select Doc Tabs.
- From the Item drop-down list, select Compliance Tab.
- Click Show Live Configuration.
- (if necessary) Click Show Visible Only to deselect it. By default the Pay Request Doc Type does not have the Compliance Tab visible.

- Click Copy and edit this Configuration item to copy the Doc Tabs | Compliance Tab row.
- Make sure both Visible and Active are selected.
- Accept the row.
- Save your changes.
Your Pay Request documents will now show the Compliance tab.