
Creating the first Pay Application is different from the creating other Pay Application documents.
Note: The Project Setup document Status must be Committed before you can create the Pay Application and SOV for the project.
To create the initial Pay Application and SOV:
- Open the Project Setup document.
- From Actions and Options, select Customer Pay Application. The Pay Application document will open, and the Bid document, if there is one, will appear as an attachment.

- (optional) On the Document Header, change the Description.
- On the Dates tab, complete the Start and Finish dates on the Application Period row.
- (optional) Add other information for your pay application, including sales tax info and retention percentages, if necessary.
- Save the Pay Application document.
- From the mid-section, click Open (Excel icon) to access the SOV workbook. The SOV takes certain information from the Project Setup document, including Items if any.
If there is a discrepancy between the sales tax rate on the Pay Application and the Project Setup documents, a confirmation box will appear.

– If you want to use the information from the Pay Application, click Yes.
– If you want to use the information from the Project Setup document, click No.
Note: If there is a sales tax ID and/or rate on only the Project Setup or the Pay Application, that information will be used in the SOV, and you will not see a confirmation box.
If you did enter retention percentages on the Project Setup, but there is a discrepancy between that information and the retention on the Pay Application, the following will appear:
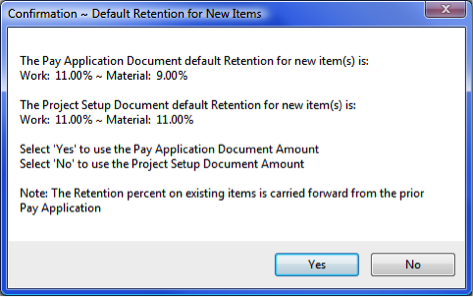
– If you want to use the information from the Pay Application, click Yes.
– If you want to use information from the Project Setup/Contract, click No.
Note: If there is retention information on only the Project Setup or the Pay Application document, that information will be used in the SOV, and you will not see a confirmation box.
Note: Changes made to retention affect only new items in the SOV; retention on existing items (from prior Pay Applications) is not changed. - Edit the SOV workbook if necessary, then close it. When prompted to save, click Yes.
- Add other information to the document, add attachments, and create a route if necessary.
- Either route the document to another person or Save and Close the document.
You can reopen the document as needed to make changes and/or change its status.
The SOV must include a Revenue Code and an Account Category for each row before it can be Invoiced.
When the Pay Application is Printed or Invoiced, a new Pay Application can be created.
When the Pay Application status is Completed, the document can no longer be edited.
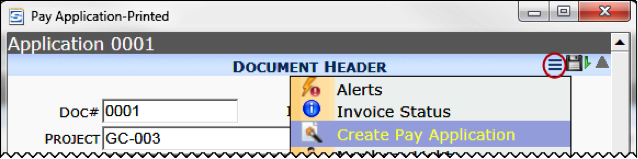
To create subsequent Pay Applications:
- Open the current Pay Application document (provided its status is Printed or Invoiced).
- From the Actions and Options menu, click Create Pay Application.
Statuses for Pay Applications
By default, the Status drop-down list offers the following choices: In Process, Canceled, Draft.
- In Process allows full editing.
- When you set the status to Draft (and save), the SOV workbook and some fields on the Pay Application document become read-only. In addition, the Status drop-down list offers three new choices: Completed, Invoiced, Printed.
- The documents must to set to Printed or Invoiced before you can create another Pay Application document.
- When the Pay Application document is Invoiced, SOV data is exported to Microsoft Dynamics SL Flexible Billing (if integrated). After the invoice is posted in Microsoft Dynamics SL, you can return the status to In Process by choosing the Reverse option from the Actions and Options menu. Reversing in Spitfire creates a reversal invoice in Microsoft Dynamics SL, which must then be posted.
- When the status is Invoiced, the Status drop-down list offers the following: Completed, Invoiced.
- Completed is the final status and selecting it “closes” the document (ie, it can no longer be edited).