KBA-01344: Converting SOV Print Format Templates from V2.1 to V3.0
Spitfire Client Services > Knowledge Base > KBA-01344: Converting SOV Print Format Templates from V2.1 to V3.0
Dorothy McGovern
February 4, 2013
| Purpose & Scope |
| You can print your Schedule of Values (SOV)–which is opened from a Pay Application document–using the SOV Print option from the Spitfire Menu. However, in order to do so, you need an SOV Print Format Template. If you created a template for sfPMS V2.1, and have upgraded to sfPMS V3.0, you‘ll need to upgrade your template also. The following instructions tell you how.
Note: These changes should be done by the System Administrator or the person responsible for the creation and maintenance of the SOV Print Format Templates. |
| Procedure |
- Find your SOV Print Format Template on your computer. It is a Microsoft Excel file with the .xlt extension.
- (optional) Make a copy of this file in case you need to redo these instructions. (Right-click, copy then paste.)
- In order to edit the actual .xlt template file, right-click on its name and select Open. (Do not double-click on the filename.)
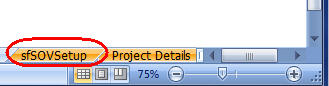
- Click on the sfSOVSetup worksheet on the bottom. (You might need to scroll to find it. If it is not visible, unhide this and all worksheets in the workbook.)
- Click on cell C1 (where it says ‘2.1‘) and type 3.0.
Note: If the zero does not show up, right-click and select Format Cells. In the Number tab, change the Category to Text. Do NOT change it to Number. Click OK. Now type 3.0 again.
- Note the Values for the following three rows (highlighted in yellow): Original SOV Data Sheet Name, Change Order Data Sheet Name, Subtotal Data Sheet Name. In our example, these are SOVs, COs, and HSMaster.
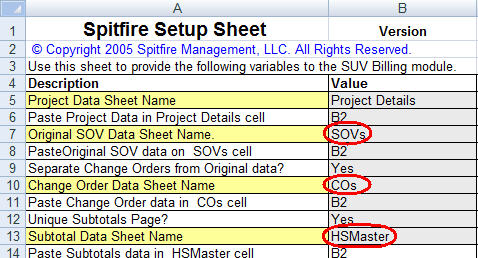
You will find corresponding worksheets at the bottom.

- Click on the SOVs worksheet (or your equivalent).
- Find the Description column and click on the letter above it (usually H or I) to highlight the whole column.
- Right-click then select Cut.
- Click on the letter above the Subtotal Criteria (Max 5) column (usually B or C).
- Right-click then select Insert Cut Cells. The Description column should now appear before the Subtotal Criteria column, making it the new B or C column.
- Repeat steps 7 – 11 for the COs and HSMaster (or equivalent) worksheets, if available.
- Check to see that the Description of Work column in your Schedule Sheets has retained proper references. To do this:
- Click sfSOVSetup to get back to that sheet.
- Note the Value for the row Schedule 1 Sheet Name (highlighted in yellow), for example OC_PG1.

- Click on the corresponding worksheet, found at the bottom.

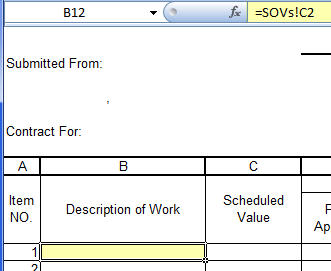
- Click on the cell underneath the cell that says Description of Work. In the formula bar, it should say =SOVs!C2 (or B2). This formula is referencing the column that holds the Description on the SOVs sheet (B or C). If it is incorrect, change it for all cells in the Description of Work column.
- Repeat the process for all your Schedule Sheets for SOVs then for COs and HSMaster.
- Save the template. If it is deployed by Office 2003, save it as an .xlt file. If it is deployed by Office 2007, save it as an .xltm (Excel Macro-enabled) file. It is now ready to be used in sfPMS 3.0.
|
| Additional Comments |
| For more information about the SOV workbook, see the Focus on Schedule of Values (SOV) Billing guide.
For information on the Migration Utility for v4.x, see KBA-01513 |
| KBA-01344; Last Updated 2/4/2013 8:33:24 AM |
| Keywords: SOV, Pay Application, Template, Print |