Purpose & Scope:
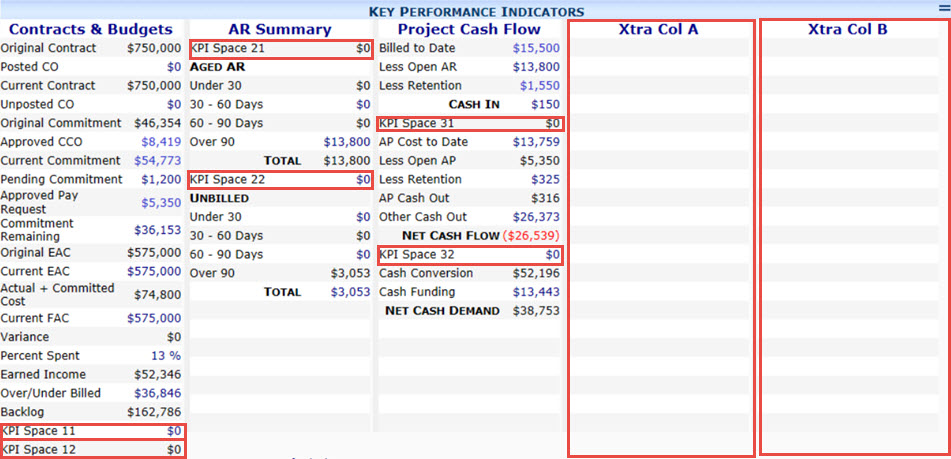
You can configure the look of the KPI on the Project Dashboard by deciding how many columns should appear, what labels appear in bold or centered, and what rows of information are included. This configuration is done through the UI Configuration tool on the System Admin Dashboard.
Procedure:
- Go to the UI Configuration tool on the System Admin Dashboard.
- Select Project KPI as the Part.
- Select the Item that corresponds to the row/column that you want to change. Aside from all the rows that appear by default on the Project Dashboard, there are rows and columns that you can add and label as needed.

Note that there are items that affect several rows at once:- Contract Col, if not visible, makes its entire column not visible.
- AR Summary Col, if not visible, makes its entire column not visible.
- Project Cash Flow Col, if not visible, makes its entire column not visible.
- Xtra Col A, if not visible, makes its entire column not visible.
- Xtra Col B, if not visible, makes its entire column not visible.
- Use the options for each configuration item as needed:
-
- Change any label for an Item on the Label field.
- Use the Visible checkbox to make an Item visible or hidden.
- Enter numbers in the Seq field to control the order of the rows in a column from top to bottom. Seq numbers need not be consecutive or unique; repeated numbers will display in the item name order.
- Use the Format field to control the display format of the value. For example:
- hide = hide the value and use the full width for the label (used, for example, for the column headers).
- C0, C1, C2, C3, C4 = currency with no decimal places, one decimal place, etc. to a max of 4 decimal places.
- F0, F1, F2, F3 = numeric with no decimal places, one decimal place, two decimal places, three decimal places, etc.
- P0, P1, P2, P3 = percentage with no decimal places, one decimal place, two decimal places, three decimal places, etc.
- Use special Extended options. For example:
- Col=n specifies the column number. 1-9 columns are recommended. While you can skip column numbers, they should remain small. See Additional Comments below.
- CSS=x specifies the style to be applied to the label. Common values are
- clsKPILabel (the default)
- clsKPILabelBold (as the Aged AR header shown above)
- clsKPILabelBoldRight (as the Cash In header shown above)
- clsKPIHeader (as AR Summary header shown above)
- DataField=fldname specifies the field from the KPI query or a computed field (see KBA-01228)
An example of how the Cash In item shown above is configured:
Additional Comments:
For more information about the values that appear on the rows of your KPI, see KBA-01152 and KBA-01228. Note: sfPMS is distributed with 3 columns. The columns are numbered 1, 3 and 5 so that you can easily add a column 2 or 4 between our columns. Of course, you can also add columns to the right of column 5 (using 6 or higher). The only labor intensive configuration would be to add a new column to the left of column 1. Possible, but tedious.
KBA-01585; Last updated: December 10, 2019 at 10:21 am
Keywords: KPI, customization

