Question:
Can I change the Vendor on a Committed Commitment? Or change the Project on an approved Bid document? Or make other changes “behind the scenes” to document fields?
Answer:
If you are a System Admin, you can use the Poke tool on the Diagnostic Tools Tab to change the value of document fields. The instructions below are fairly generic, use a contact field (Source Contact) as an example and apply to Chrome only.
For another example, see KBA-01649: Moving a Document to Another Project.
To change values using the Poke tool:
- Open Notepad or other “scratch pad” to gather information you will need.
- Open the document that you want changed.
- If the field that you want to change is in the Document Header:
- Double-click to the left of the
 logo. A pop-up window will appear.
 - Copy the DataPK value (a long alphanumeric string) to Notepad.
- Close the pop-up window.
- Double-click to the left of the
- If the field that you want to change is not in the Document Header, see Poking Other Tables below to get the appropriate string and copy that to Notepad.
- If the field that you want to change is in the Document Header:
- On the document, click on the field whose value will change. In Notepad, write down
- The SQL database table name. Note that DocMasterDetail = DocHeader.
- The SQL database fieldname. You can see both tablename and fieldname at the bottom of the document

- The current value of the field.
- If you are changing a field that uses codes (for example, Status), jot down the current code and the new code.
- If you do not need to change a code, while still on that field, right-click and select Inspect from the options:
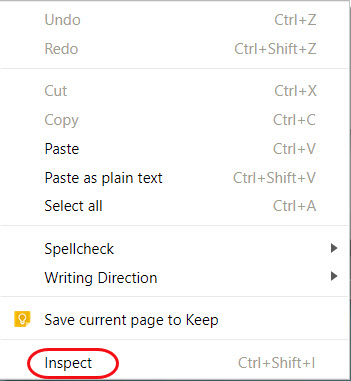
- In the highlighted code that appears, look for the internal database value of the field after data-dbv= or data-pv=. Note:
- Contacts use a GUID for the internal value
- Text fields are the actual text strings
- Copy this info to Notepad.
- Note: if the document is a Commitment, consider if the field needs to also be changed on related documents such as Pay Requests. If so:
- Find related documents
- Find and copy the DataPK for each document onto Notepad
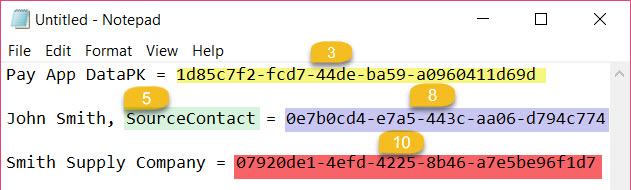
- Using the Inspect option as above, find and copy the new value for the field. You might need to go elsewhere, such as a different document or the Contacts dashboard, to find the new value. Your Notepad might look something like this (minus the pointers and colors):
- Close all windows (except Notepad and Spitfire).
- From the Site Options menu (your name), select Diagnostic Tools.
- Select the Poke tab.
- Fill out the fields as follows
- Table = xsfDocHeader (for any fields in the Doc Header or use the appropriate table name).
- Column = the database fieldname (shown in light green in the example above)
- Key = DocMasterKey = the DataPK or equivalent string (shown in yellow in the example above)
- Prior = the current value (shown in lilac in the example above)
- Set To = the new value (shown in red in the example above). You can also set the value to NULL.
- Click the Set Value button.
- To check, reopen the document from Recent Documents (on the Site Options menu).
Caveats and Cautions
- If the document is a posting document, this procedure does not change the posting.
- When poking a new Source Date on a Pay Request, you must also poke the Source Date on the attached AP Voucher.
- For changing the project, see KBA-01649: Moving a Document to Another Project.
Poking Other Tables
The DataPK described in step 3 works for the Document Header. If the field you need to poke is in a different table, you need to track down its key.
Note: To find the name of the bit of information (field) you need to change, Inspect that field and look for what follows data-dbf. That will tell you the table and column that you will need.
xsfDocRevision
- Open the document in Google Chrome and use the Chrome Inspector as indicated in step 5 above.
- Open the Console.
- Paste the following command into the console; the output includes the DocRevKey – use this in place of the DataPK
GetJSONPX("get/{0}/DocRevision/DocRevKey/0/Created/Notes".format(sfWCC.dsCacheKey)).done(function (r) { console.log(r);}); - Look for DocRevKey and copy that key onto Notepad in place of the DataPK.
xsfDocItem
- Open the document in Google Chrome and go to the Items tab.
- Find the Item you wish to poke, right-click in the grid row near the icons (first column) and select Inspect.
- In the HTML markup displayed by Chrome, look up slightly for the Item’s DataPK. You are looking for id=itemsgridsorthandle data-pk=”…”
- Copy that data-pk string onto Notepad in place of the document’s DataPK.
xsfDocItemTask
- Open the document in Google Chrome and go to the Items tab.
- Find the Item you wish to poke, right-click in the grid row near the icons (first column) and select Inspect.
- Go to Console tab on top and click the clear button.
- Copy the following with the correct Item number then press Enter:
sfAPIGetRows("DocItemTask/1/ProjEntity/AccountCategory/UOM", { dFilter: " Parent.DocItemNumber ='0015' " }) .done(function (r) { console.log(r) }) - Copy the resulting ItemTaskKey. You will use Key = ItemTaskKey and this GUID instead of the DataPK.
xsfDocRoute
- Open the document in Google Chrome and go to the Route Detail tab.
- Find the row you wish to poke, right-click near the icons (first column) and select Inspect.
- Look for the row’s DataPK. You are looking for data-pk within a DIV.
- Copy that data-pk string onto Notepad in place of the document’s DataPK.
- If you need to change the person:
- Right-click on the person’s name and Inspect. (If person is not on the route, you can Inspect from someone else the name appears.)
- Copy the data-pv GUID onto Notepad.
KBA-01701; Last updated: January 5, 2022 at 10:58 am
Keywords: change value, GUIDs