Spitfire Document Processing Steps
Spitfire Client Services > Documentation > Spitfire Document Processing Steps
Dorothy McGovern
June 27, 2017
- Click Attach Image or Attach Pay Request to open the Spitfire Attach To Document dialog box.
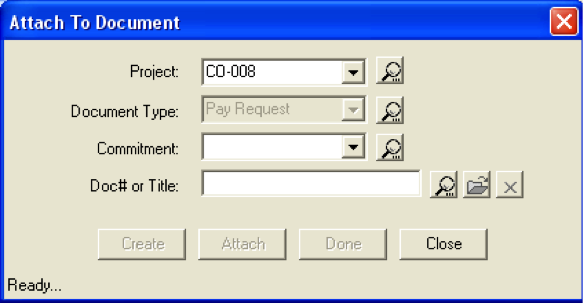
- (optional) In Project, select a Project ID from the drop-down list or lookup.
- In Document Type, select a Doc Type from the drop-down list or lookup.
- If you clicked Attach Pay Request, in Commitment select Commitment document from the drop-down list or lookup for the Pay Request. This is a required field for Pay Requests.
- (optional) Click Create to build a new Spitfire document for the Project. It will be of the Doc Type entered above.
- If a new document was not created, In Doc# or Title, click Lookup to select an existing Spitfire document.
– (optional) Click Open to access the document so you can add notes and routing.
– Click Attach to add the scanned image to the selected document.
- Either click Done to close the dialog box and remove the scanned image from the Batch Viewer.
– OR –
Click Close to close the dialog box but leave the scanned image in the Batch Viewer so you can attach it to additional documents.
- Proceed through the images in the Batch Viewer until you have finished processing.
- Close the Batch Viewer. Any scanned images you have not processed will be available when you reopen the Batch Viewer.