
The Import Wizard allows you to locate a source document from which to create a Budget from existing data. For example, you might use sophisticated estimating/bidding software that reviews every aspect of the project at a very deep level of granularity resulting in a comprehensive work-breakdown-structure with pricing. Successful bids then need to be moved into the Project Management and Accounting systems. The primary task of the Import Wizard is to make this transition as efficient as possible. Whether you use off-the-shelf estimating/bid applications or home-built spreadsheets to create project bids, the Import Wizard can make light work of creating a budget for new projects.
Prerequisite: Consolidation Sheets
The Import Wizard requires Consolidation Sheets. A Consolidation Sheet ensures that the spreadsheet to be imported matches the Cost Code-Account Category structure of BFA. (Cost Codes must be in rows, and Account Categories can be in either rows or columns.)
Before using the Import Wizard, make sure you have an appropriate Consolidation Sheet.
To import a budget:
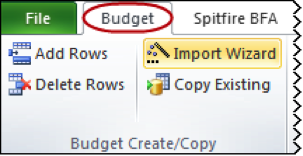
- From the Budget ribbon, select Import Wizard.
Note: As the Import Wizard guides you through the import process, the pages depend on your selections. - At the Import Source section:
Select Local File to browse for the file containing the source data you want to import.
OR
Select Catalog, select a Doc Type, and browse for the file in the Spitfire Catalog containing the source data. This option allows you to access a source file that was previously attached to a Spitfire document (ie: Bid or Estimate document).
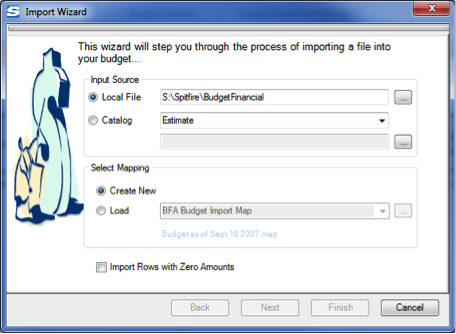
- In the Select Mapping section:
Select Create New to create a mapping file through the Import Wizard
OR
Select Load to use an existing mapping file. A default mapping file might appear in the drop-down menu if you previously used a mapping file or if there are mapping files in sfPMS (uploaded through the Templates tool). You can also browse for a mapping file on your computer.
Note: The actual name of the file appears below the field. - Check Import Rows with Zero Amounts if you want to include rows with a zero amount in your import.
- (optional) If this is not the first time you are using the Import Wizard and have selected a mapping file you have used before, click Finish and skip to step 14.
- Click Next. The Workbook Options page will appear.

- In Worksheet, select the worksheet containing the data to be imported. A list of possible worksheets takes from the indicated workbook will be available.
- Click Next. The Account Categories and Options page will appear.
Note: The remaining instructions explain how to create a mapping. If you are using an existing mapping, you can review existing information as you view each of the following Wizard screens.
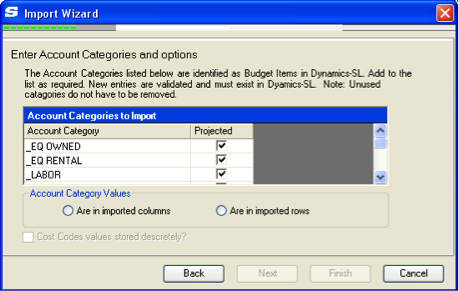
This page displays all Account Categories defined in Microsoft Dynamics SL (or Work Categories in sfPMS if not integrated) as Budget Accounts. It also offers a convenient way to select if the Account Category will be projected. - Select either Are in imported columns or Are in imported rows depending on how the information in the spreadsheet to be imported is configured.
- Click Next.
- If Account Category Values are in Imported Rows
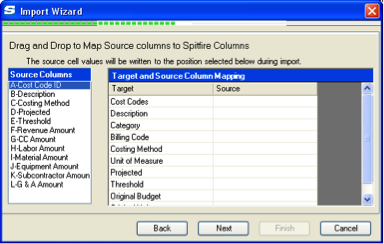
The area on the left is a list of each column in the source worksheet. The area on the right lists Target and Source.
Drag and drop the appropriate column name from the left area to the corresponding row on the right.
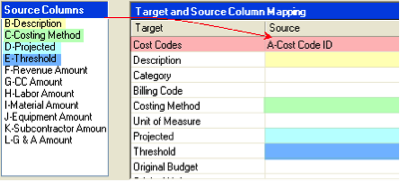
Not all column names need to be positioned, however, anything not mapped will not be included in the Import process.
Click Next.
OR
If Account Category values are in Imported Columns
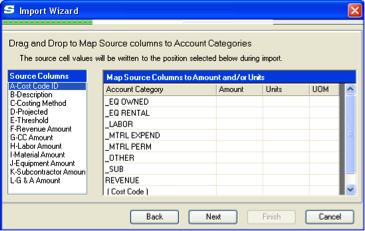
The area on the left is a list each column in the source worksheet. The area on the right lists your Account Categories and has four columns: Account Category, Amount, Units, and UOM.
Drag and drop the appropriate column name from the left area to the corresponding row and column on the right.
Click Next. - Map additional source columns on the next page.

Note: This step is not required if your import data is in rows.
The area on the left lists the columns from the source worksheet that remain unmapped. The area on the right has two columns: Target and Source.
Drag and drop as appropriate. Note all columns need to be positioned.
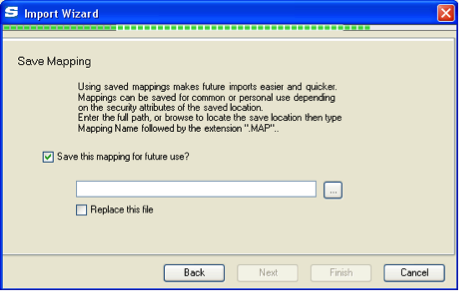
Click Next. - Save your mapping.
- Preview your rows on the next page.

- If the values appear in the wrong columns, click Back or click Cancel to begin again.
- Click Finish to import your data. The Select Import Row window will open.
- Review the rows.
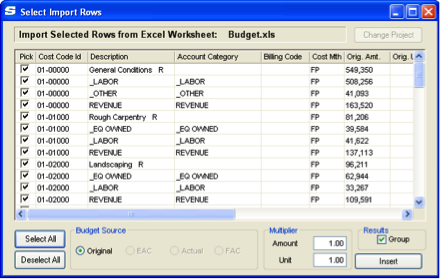
- Click the checkboxes in the Pick column.
- Edit the Multiplier for Amount or Unit as necessary.
- Click Insert to add these rows to the BFA worksheet.
- Back in the BFA worksheet, check your rows to ensure you have entered what you intended.
- Save your entries.
- Close Excel and return to the Spitfire Budget document.