Purpose & Scope:
Spitfire reports are SQL Server Reporting Services (SSRS) reports. Spitfire uses a few conventions when organizing reports in SSRS and has recommended conventions for deploying custom reports at your site.
Procedure:
SSRS has a Report Manager that is available through your browser. Your network administrator should be able to provide the URL. Access to SSRS is controlled by your network administrator because SSRS uses Windows Authentication for access.Follow the steps in this KBA to learn about Spitfire‘s conventions as well as how you should add a custom report.
- Open the Report Manager. You‘ll notice several Spitfire report folders, one for each of the Spitfire sites installed. Your site will likely only have two or three site folders.
- Click on a folder to get into that site‘s reports. Inside the site folder, you‘ll find four folders. Notice that _Library begins with an underscore. The underscore designates this as a “working/admin” folder and, therefore, one that will not show up in Spitfire for users to access. The other three folders—Admin, Executive and General—are what users see in the Spitfire Report Browser. These folders contain links to the reports actually stored in _Library.
Important: While you can create as many new folders as you want, you should not delete or edit Spitfire‘s default folders. Spitfire will refresh these default SSRS folders with every update and publish both enhanced versions of the standard reports and add new standard reports to these folders. - To add your own custom folder
- Create a folder (using the New Folder option). The name of this folder must begin with the underscore, for example, _Custom.
- Create a second folder (‘Acme‘ in our example) in which you will place links to your report.

- Click on _Library to open it. Here you will find all the Spitfire reports. The Admin, Executive and General folders hold linked reports pointing back to this _Library folder.
- You may want to modify certain files in this _Library folder. ReportHeader.gif and ReportLogo.gif are used to include your logo at the top of reports. ReportHeaderCompany displays your company name and is edited by Spitfire through an entry in the Spitfire Install and Configuration Tool (ICTool).
- The sr_ prefix is a convention that Spitfire uses to indicate a ‘reusable‘ piece for reports — commonly referred to as a subreport.
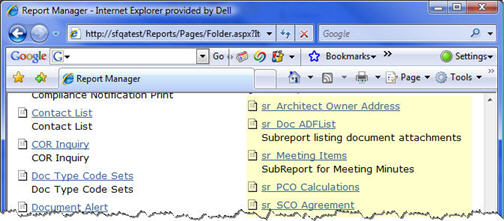
- Notice the sfDocSys file. This file links the reports in this folder to the correct SQL Server database for data. That means that a report written for a test site can be copied and uploaded to the live site without any changes. By using the sfDocSys file, the new report will automatically connect to the appropriate database for this report folder.
- Click the Details button to toggle between Show and Hide Details. While in Show Detail mode, you can click the icon in the Edit column to move to the Properties for any particular report.
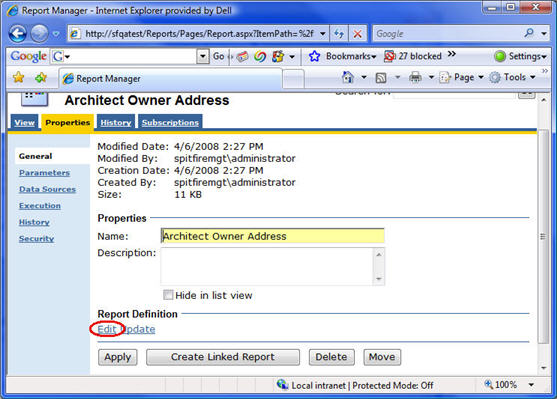
- If you want to copy an existing report to use as the basis of your customized report, go to the Properties for that report.

- If you want to copy an existing report to use as the basis of your customized report, go to the Properties for that report.
- In Properties, you can click Edit and point to a location to save a copy of the SSRS report to your hard drive as an RDL file. We recommend you rename the report when you save it to avoid confusion with the original. Spend some time and develop your own naming convention.
- Make changes to the RDL file as needed. Since RDL files are just plain text XML, you can use Notepad for simple changes, or import the RDL file into your report design tool. Microsoft provides this tool with several of their products, including SQL Server and Visual Studio.
- When your changes are complete, go to your _Custom folder and click Upload File. Browse for your RDL and upload it.

- Open the Properties for your new report, as described in steps 7 and 8.
- Observe that now that the report exists in Report Manager, you can export and update the report from this Properties page. You would use the Update link (next to Edit) if you wanted to make further changes to this RDL.
- Click the Create Linked Report button at the bottom of the Properties page.
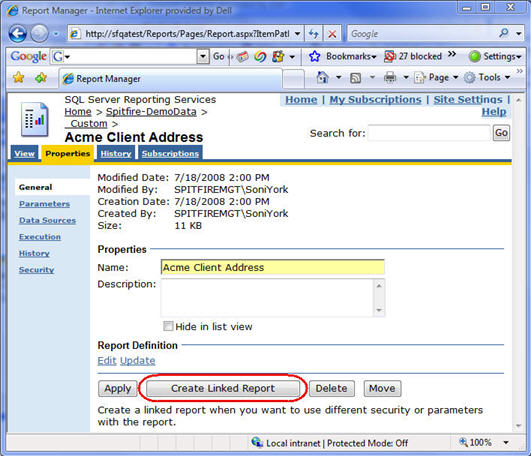
- Type a name for your new report. This is the name of the report that users will see in the new ‘Acme‘ folder in the Report Browser. Optionally add a description (that will appear in the Report Viewer).
- Click the Change Location button, place the report into your new ‘Acme‘ folder and click OK.
- Click OK to finish the linked report.
- Navigate to your ‘Acme‘ folder and observe the new link to your new report. This will appear in the Report Browser in Spitfire in about 10 minutes.
Additional Comments:
If you do not want users to see a Spitfire default folder, use the Report Folders tool on the System Admin Dashboard in Spitfire to remove view access to that folder for specific roles. Of course, the System Administrator will still be able to view all folders. Spitfire recommends using stored procedure to gather data. See the Developers Primer for an overview of Spitfire‘s SQL procedures and views.
KBA-01349; Last updated: October 10, 2016 at 14:08 pm;
Keywords: conventions, folders