

To scan a one-page file:
- Place the page you want to scan on your scanner.
- Click Add Files.
- Click the Preview tab and scan the page.
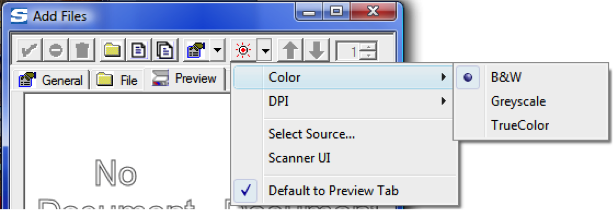
- (optional) Click Scan Options, select Color, and select the appropriate option.
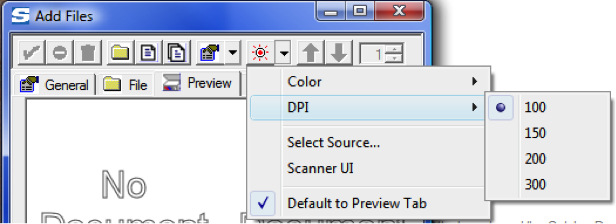
- (optional) Click Scan Options, select DPI, and select the appropriate option.
- (optional) Click Scan Options, select Scanner UI. Additional prompts will appear once you begin the scan so you can select the scanner’s settings to fine-tune the results.

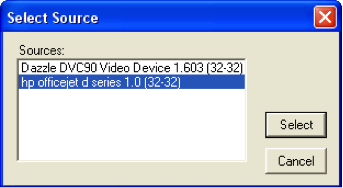
- (optional) Click Scan Options, select Select Source, and select your scanner from the pop-up window.

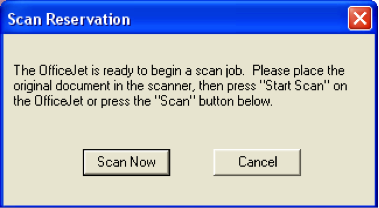
- Click Scan One Page. Depending on your setup, the following message may appear.
- (optional) Click Reject the selected File, Scan, or Link if necessary.
- (optional) Use the Contrast Slider at the bottom of the window to adjust the image’s contrast.
- Click the General Tab and enter a Note.
- Click Accept.
To scan a multiple pages:
- Complete steps 1-7 from above.
- Click Scan Multiple Pages. An information box will appear while you pages are scanned into sfPMS.
- Click Scan One Page, and a dialog box will appear. If you want to scan a second page to the same file, click Yes, If you want to scan a second page that is not part of the same file, click No.
- For each file, click the General tab and enter a keyword.
- Click Accept.
To upload a file from your workstation:
- Click Add Files.
- Click the File tab.
- Either drag and drop files from your computer to the File area OR click Browse to find the files.
- Accept the files.
Links, such as URLs, to information stored elsewhere are consider a type of file in sfPMS. As such you can add links to the Catalog and as attachments to documents.
To add a link:
- Click Add Files.
- Click the File tab.
- From the other window, drag and drop your link in to the File area.
A Link from a SharePoint file.

A URL from the internet.
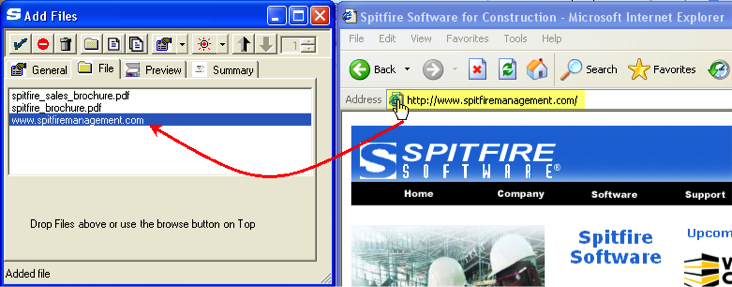
- Click Accept. Back at the Catalog, the links will appear in the file list.
Approving and Routing Scanned/Uploaded Files
Your site may be configured so that all uploaded and scanned files are approved automatically. However, if automatic approval is turned off and you have the permission to do so, you can approve files during the scan/upload process. You can also choose to route files either individually or as a group through the Catalog File Route document.
To approve you scanned/routed file(s):
- After scanning or uploading your files but before accepting them, click File Options and Approve all added files.
- Accept all scanned/uploaded files.
To route your scanned/uploaded file(s):
- After scanning or uploading your files but before accepting them, click File Options and select Route File.
- If you are routing one file, select Individually; if you are route multiple files, select Individually or Together, depending on whether you want all files routing together or not.
- Accept all scanned/uploaded files. The file(s) will be routed through the Catalog File Route document.
Exporting the Upload Summary
The Summary tab lists the files uploaded to sfPMS as well as any errors in uploading. You can export (copy) this list to Microsoft Word or Excel.
To copy the summary:
- On the Summary tab, click HTML is you want the summary in a format suitable for an application like Microsoft Word or click XML if you want the summary in a format suitable for Excel.
- Click Copy To Clipboard. The contents of the Summary tab will be placed in your Clipboard.
- Open an application outside of sfPMS (ex: Microsoft Word or Excel).
- Paste the contents.