
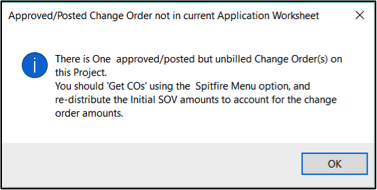
You can add information from Change Orders to your Application worksheet. A Change Order must contain billable revenue, and this revenue must be posted before it can be added to the SOV worksheet. The Change Order must also be approved. If you have posted Change Orders, the following dialog box will appear when you first open the SOV workbook.
To add items from a Change Order document directly to Application worksheet of the SOV:
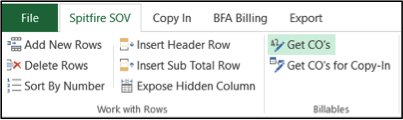
- On the Application worksheet and from the Spitfire SOV ribbon, select Get COs.
- Click the Select checkbox for any Change Orders you want to add to your worksheet.

- Click Insert.
– New SOV lines added by the Change Order will appear as bold text
– The Description column will be completed as follows:
— If there is only one Change Item, the Change Order Title (Description) will be used.
— If there are multiple Change Items consolidating into one SOV line, the Change Order Title (Description) will be used.
— If there are multiple Change Items and each Change Item creates a new SOV line, the CI Description, truncated to a length of 60, will be used, followed by the word “New”.
— If there are multiple Change Items designated to existing rows, See CO Details will be used.
– The CO No. column will indicate the number of Change Orders making the change or addition.
– The First Bill Date will appear with the date on which the Change Order information
– Informative rows in italics with a blue background will indicate which SOV lines were affected by the Change Order.
– The Scheduled Vale column will update footer rows.
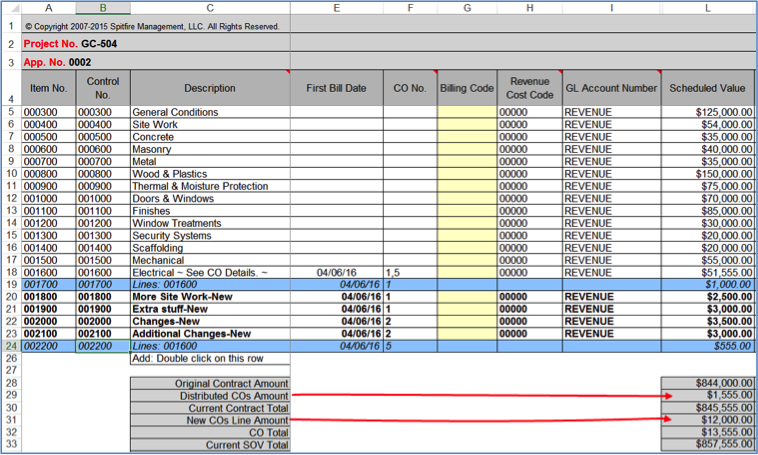
For example, the above information indicates that line 001600 was changed by Change Order 1 and Change Order 5. Those two changes are indicated in 001700 and 002200. In addition, Change Order 1 added two new lines—001800, More Site Work and 001900,Extra Stuff—and Change Order 2 added two new lines—002000, Changes and 002100, Additional Changes. - Edit your new rows (ie, change the Descriptions).
- Save the workbook.
To add items from a Change Order document using the Copy In worksheet of the SOV:
- On the Application worksheet and from the Spitfire SOV ribbon, select Get COs for Copy In.

- Select any Change Orders you want to add to your worksheet.

- Click Insert. Your Change Items will appear as rows on the Copy-In worksheet. The Description column will be completed as follows:
– If there is only one Change Item, the Change Order Title (Description) will be used.
– If there are multiple Change Items consolidating into one SOV line, the Change Order Title (Description) will be used.
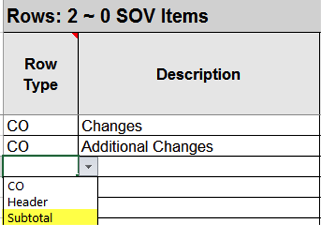
– If there are multiple Change Items and each Change Item creates a new SOV line, then the CI Description, truncated to a length of 60, will be used. - (optional) By selecting the appropriate Row Type from the drop-down list in the first column, add Subtotal rows.
You do not need to enter a subtotal amount on the Subtotal rows because any amount will be disregarded during the import to the SOV workbook.
– You should enter a Subtotal Code for each row to be added into the subtotal and for the subtotal row itself. The Subtotal Code is any five-character combination but must contain at least one alpha character.
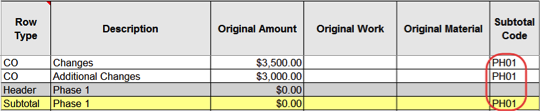
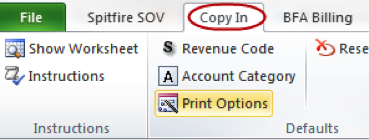
Note: The All prefix will be added to the subtotal row automatically during the import. - (optional) If your new rows will include Headers and Footers, select Print Options.
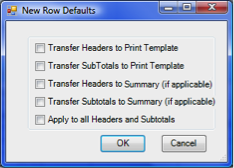
– Use the checkboxes on the New Row Defaults dialog box to indicate your print preferences for headers and subtotals. When complete, click OK.
- When all your rows are on the Copy In worksheet, select Append to SOV.

All your rows will appear on the Application worksheet.
– The CO No. column will indicate the number of the Change Order making the change or addition.
– The First Bill Date will appear with the date on which the Change Order information was added to the SOV workbook. - If you added subtotal rows and did not indicate a Subtotal Code for them on the Copy In worksheet, you will need to set up criteria for them and all related rows on the Application worksheet.