
Purpose & Scope:
The Folders tab on the Batch Upload Tool’s Configuration tab provides the functionality that allows you to:
- Upload files from multiple folders
- Route the created Scan docs with a default Route
Note: Project is not known by the Batch Upload Tool, therefore, the selected route cannot resolve roles from a Project Dashboard. The route entered here should contain contacts, not roles. - Upload the scanned image files to a specific Catalog folder
- Create one Spitfire Document per scanned file vs. creating one Spitifre Document with all the scanned files attached
Procedure:
To configure Folders for the Batch Upload Tool:
- Open the Batch Upload Tool (Start | Programs | Spitfire | Batch Upload Tool).
- Click the configure button on the Toolbar or select File | Configure.
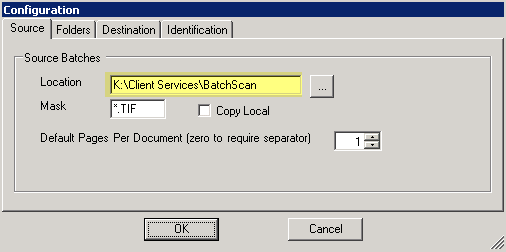
- On the Source tab, in the Location field, browse and locate the top-level folder for your scanned files.
- Click the Folders tab.
- On the Folders tab, the folders nested in your top-level folder will automatically populate the rows.
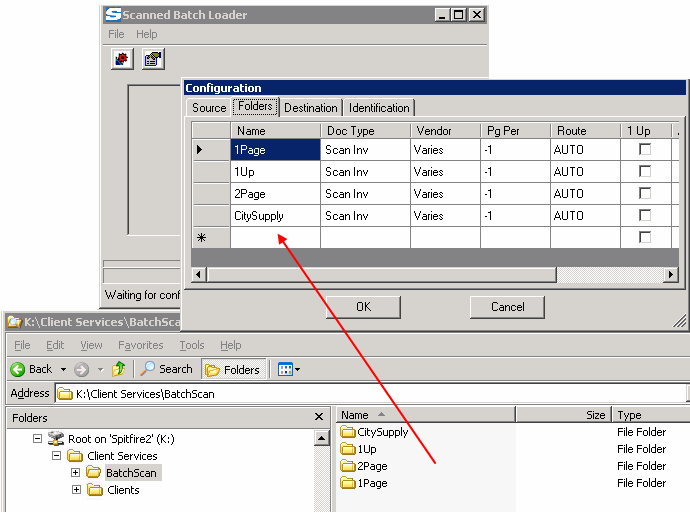
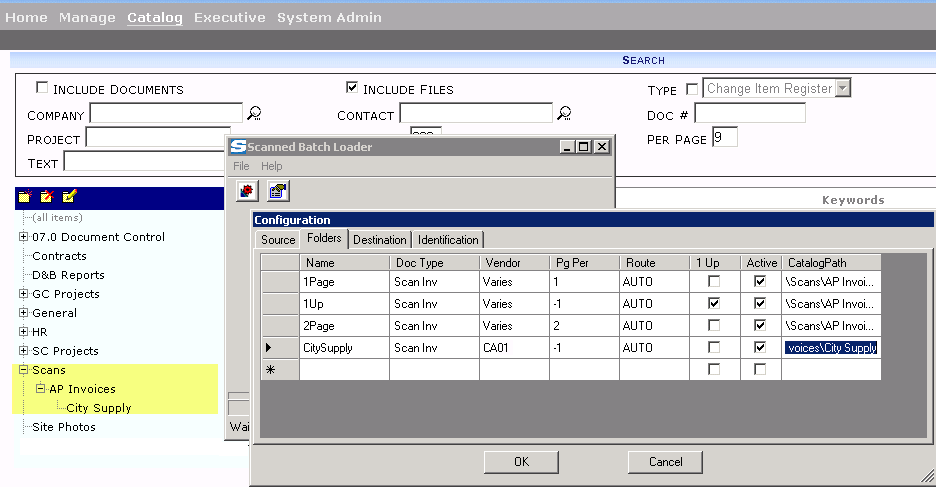
- Edit the default info in these rows to match your needs:
– Name: This is the name of the folder where your scanned file is located.
– DocType: Defaults to ScanInv, the most commonly used DocType in Batch Scanning.
– Vendor: The default, Varies, does not pass Vendor ID to Microsoft Dynamics SL. If your folder is for a
specific Vendor, enter the VendorID here.
– PgPer: Defaults to -1 which refers to the setting entered on the Source tab.
Enter 1 to indicate that each page in the scanfile should be loaded to Spitfire as a separate
file, or 2 to indicate that every 2 pages should be loaded into Spitfire as a separate
file. For example: A 50-page scanfile could create 50 1-page files in Spitfire, or
25 2-page files in Spitfire.
– Route: AUTO allows the system to use the standard route determination process.
Enter the name of a defined Route here to override the standard process and
use a specific route.
– 1 Up: Check this option if you‘d like to create a new Spitfire Document for each scanned
image in the uploaded file. For example: an uploaded file may contain 50 1-page invoices.
With 1 Up selected, 50 Spitfire documents with 1 scan file attachment will be created.
If 1 Up is not selected (clear), then one Spitfire document with 50 scan file attachments
will be created.
– Active: If selected (checked), this row will be considered in the next Batch Upload Tool
process. If not selected (clear), this row will be skipped.
– CatalogPath: Enter the Catalog folder (including path from the Catalog root) to which
the scanned files processed from this row will be uploaded. For example:
ScansAP Invoices
Note1: The is required to designate a folder below the root (all items) folder.
Note2: Be sure the user has access rights to the designated folder.
Additional Comments:
Processing Error: Scanned Batch Loader error: Server was unable to process request. –> System.ApplicationExeption: Denied at Spitfire.sfPMS.sfData.CatalogFolderKey…This error indicates that the logged in Batch Upload Tool user does not have access rights in Spitfire to insert files into the specified Catalog Folder. Check the user‘s role and access rights along with the the Catalog Folder permissions.
KBA-01283; Last updated: May 18, 2017 at 12:34 pm;