
Question:
We recently upgraded our site to V2020 and want to use bi-directional Excel templates to add Items to our Commitments and to maybe edit those Items in Excel also, as is now possible. We used to add Items with Via Excel templates. Can we use those same templates now, or how do we convert those old templates in order to use them for this newer Item functionality?
Answer:
You might be able to use your existing Via Excel templates in V2020+, even if a few changes need to be made first in the template itself, in the Templates tool and in your rules. These instructions do not apply just to Commitment documents; they apply to Via Excel templates for other Doc types also. However, the instructions below assume Microsoft Office 2016 or later. (See Additional Comments for older versions of Office).
[If you want to add bi-directional Incl/Excl tab data to your template, see also KBA-01820: Adding Inclusions/Exclusions to Your Bi-Directional Item Template after you convert your old Via Excel templates.]
[If you want to prevent the data from certain columns from changing the Spitfire document, see also KBA-01854: Pointing to RawItems in Bi-Directional Templates.]
[If you want to sort your workbook by a specific column, see also KBA-01861: Sorting Bi-Directional Workbooks.]
First, Investigate:
The Item Number is now the “key” for rows in the template, so Item numbers in the template need to match what is in the document. You can also specify an item number of “new” on row(s) to add new Items.
- Go to the DocItemConfig rule group (in the Rule Maintenance tool on the System Admin Dashboard) and see if you have an ItemNumberFormat rule set up for your Doc type. If you do not find one, the Doc type is using the default of D-3 (which means Doc number followed by three digits) unless it is one of the following Doc types. A number alone in the Result Value means there is no Doc number prefix. (You can also look a your document to see how the Item numbers show up.)
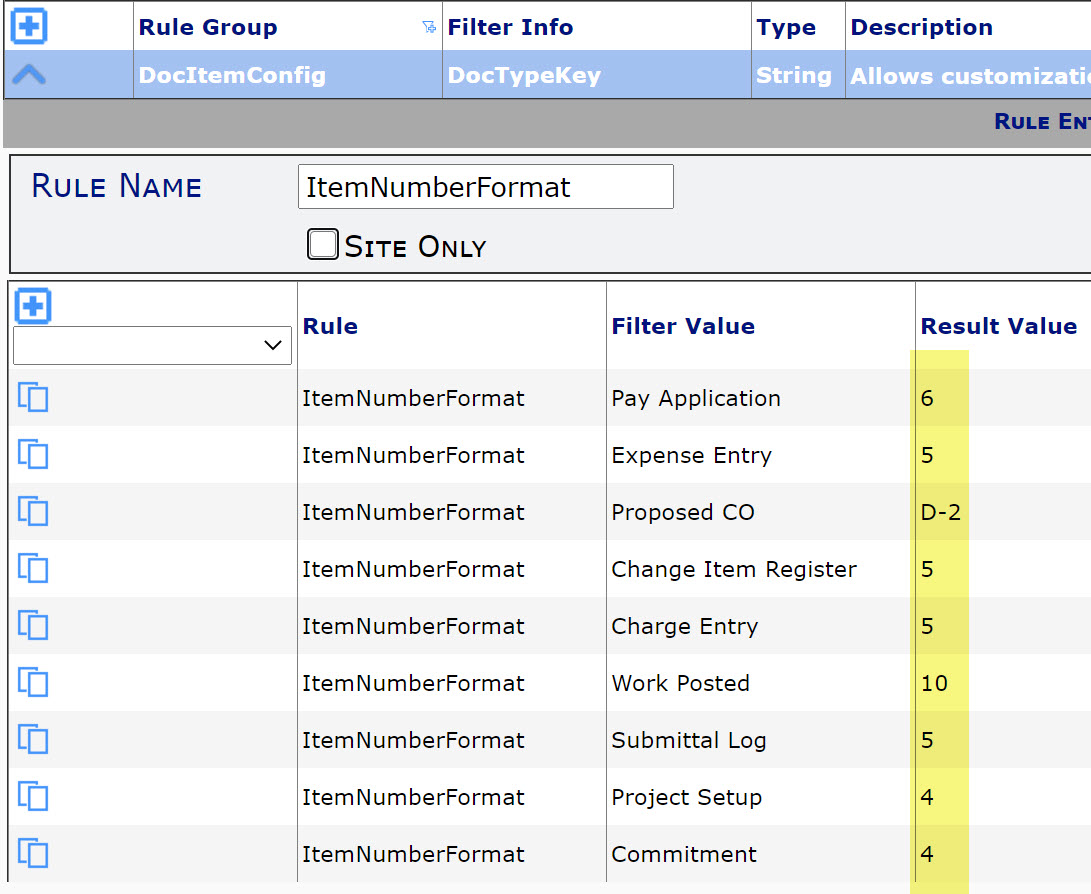
- Note the formatting (in the Result Value) somewhere because you will need this information.
Changes to your template:
- Go to your Template library in the Manage Dashboard and download the template.
- Open your template and make sure that it has a ToSpitfire tab. (It is also possible that this tab was renamed according to the VXLConfig | ImportSheet rule, but ToSpitfire is the default.) If the template does not include an import sheet, additional modifications will need to be made: contact Support.
- Look for a To_RowFlag column. This column might be hidden (for example, Column A). If you find one, either delete the column or remove the defined name from that column. The template can’t have a To_RowFlag column if it is going to use the Item Number column as described below. Contact Support if you need help unhiding and finding the column.
- Make sure that your template has a column for the Item number (such as Column B in our example below). If the template does not include this column, it is likely hidden. Contact Support if you need help unhiding and finding the column.
- Make sure that your template has a hidden column with the defined name To_DocItem_DocItemKey. When converting from classic VXL, this column almost certainly exists off the screen, such as column BB. Move this column with its defined name so that it is “inside” the working rectangle (not first or last). It is essential that this column be sorted with the working data or a sort can cause data loss.
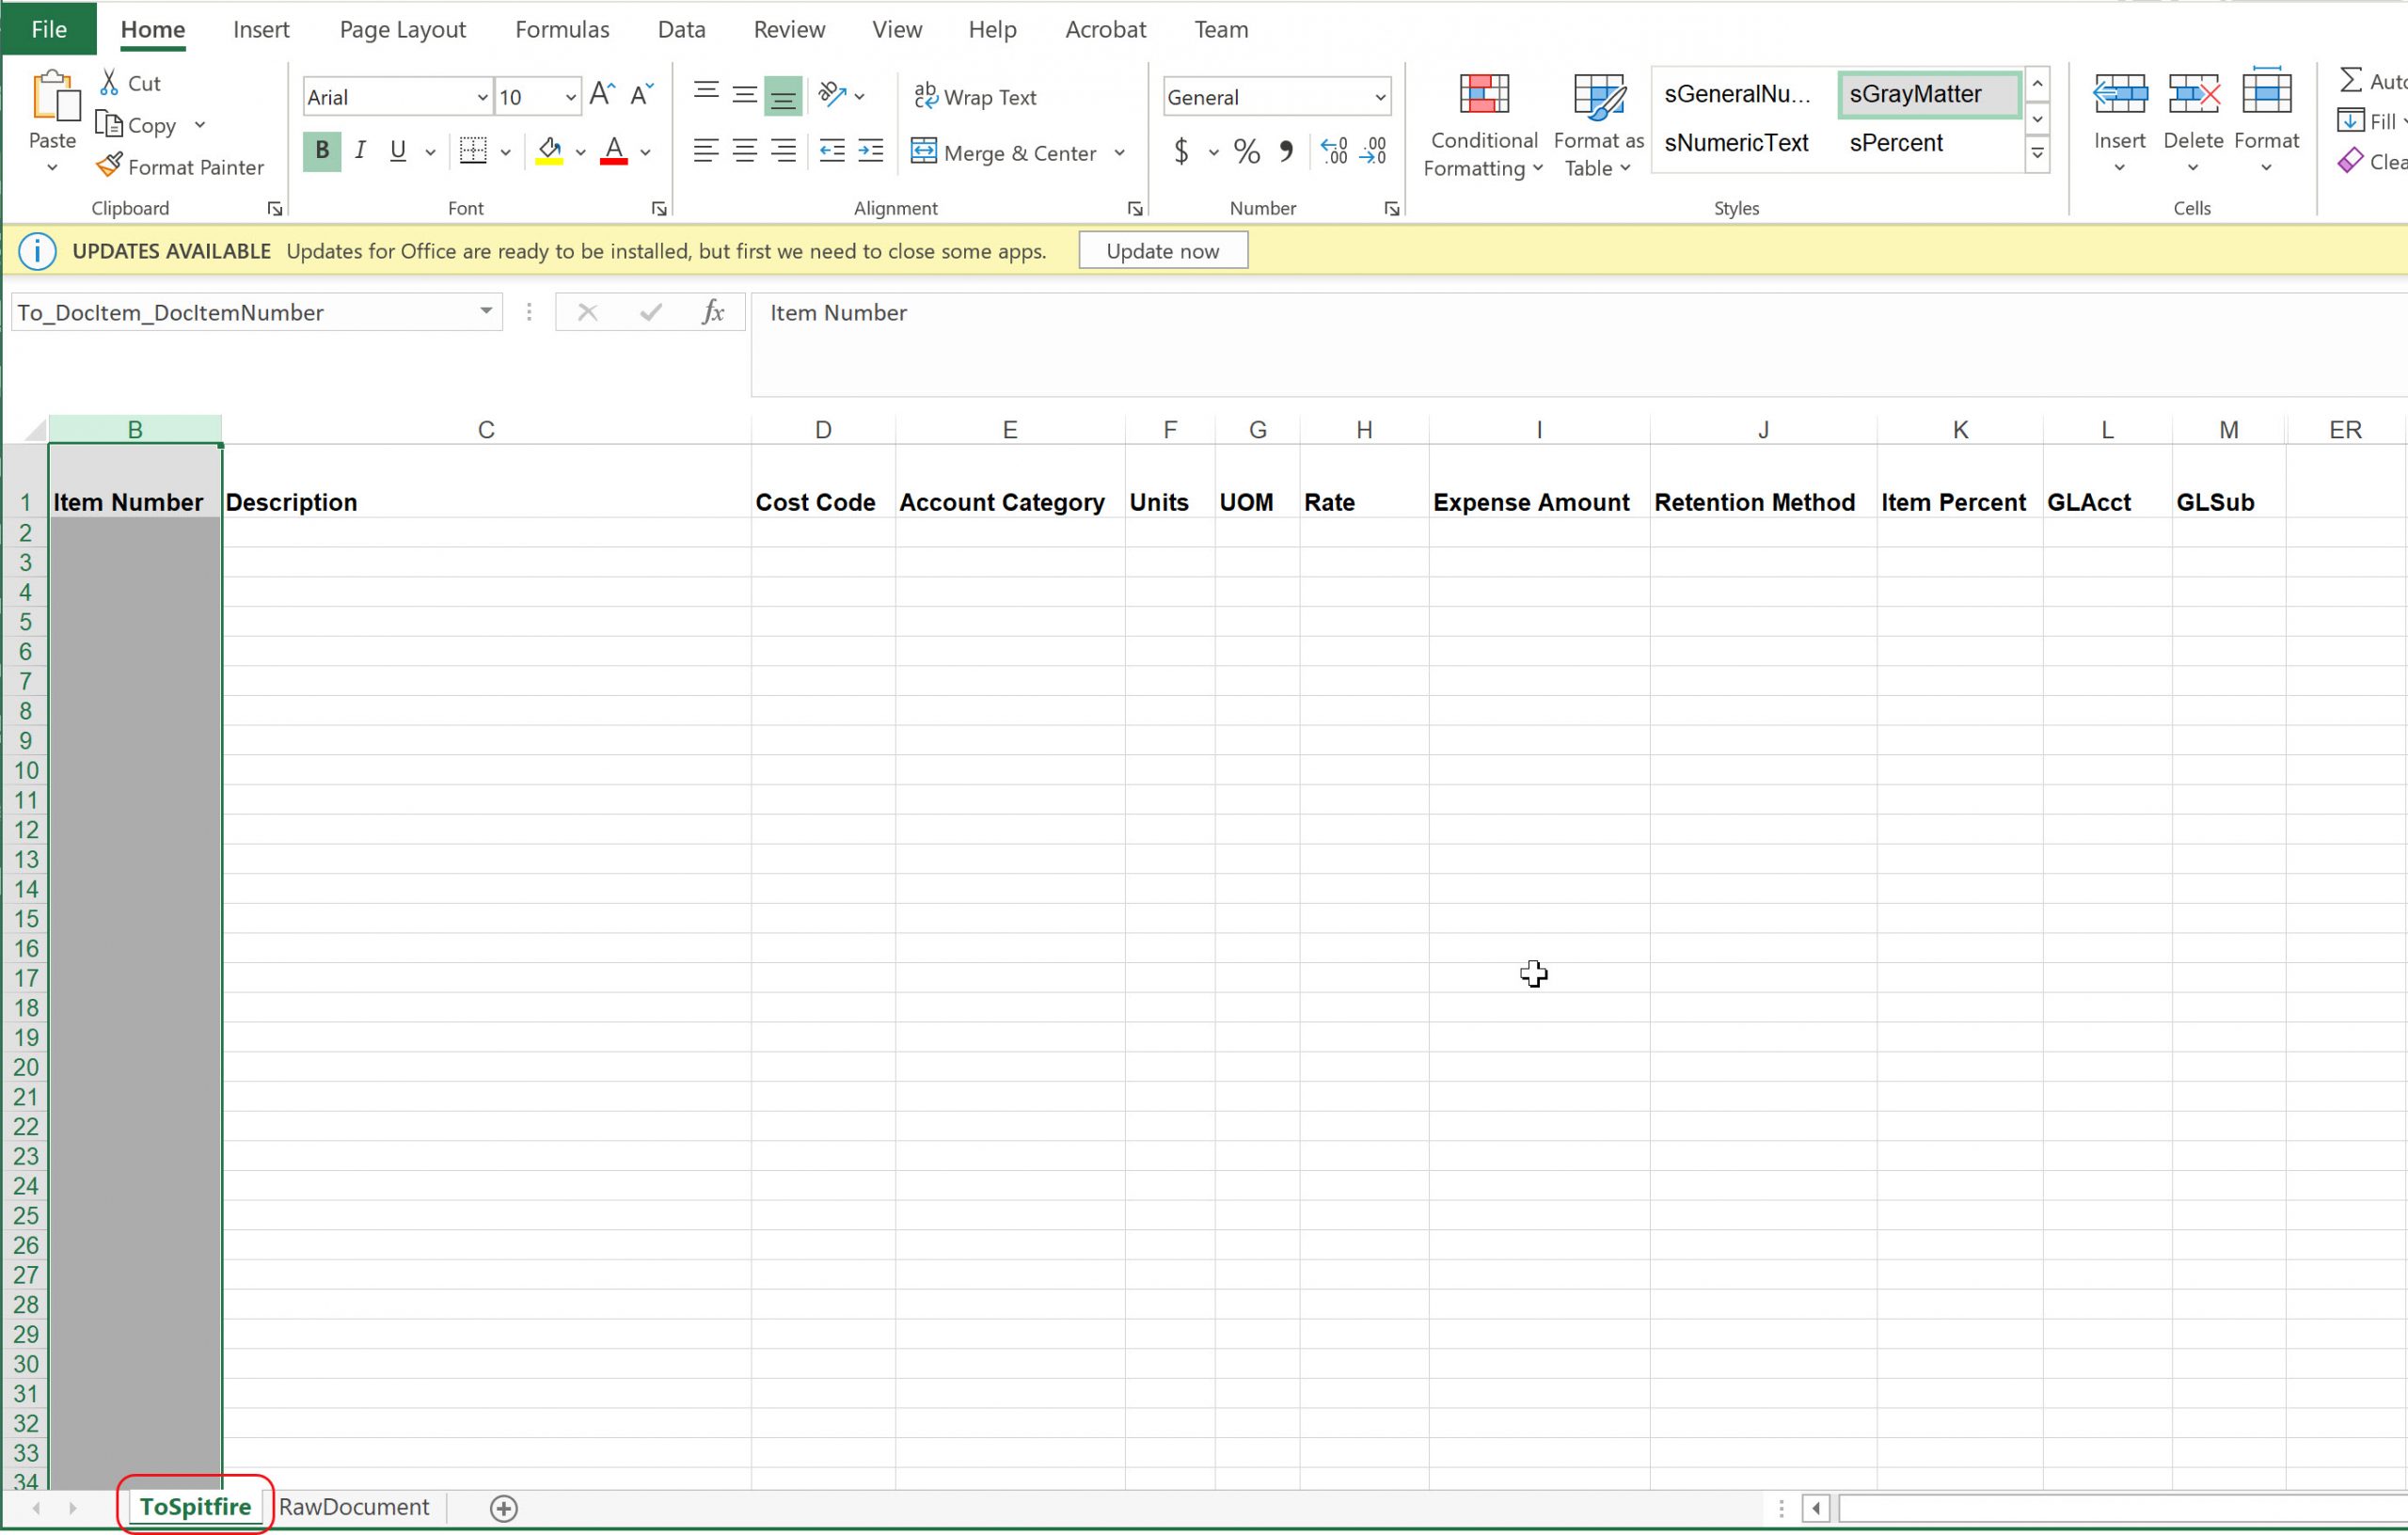
- Add the following formulas in the first cell in your Item Number row (B2 in our example).
- Use the following formula, where C2 is replaced by the first cell in your leftmost user input column and B2 is replaced by the DocItemKey column. (Use the scroll bar to see the whole formula.)
-
=IFERROR(INDEX(zRawItems_DocItem_DocItemNumber,MATCH(B2,zRawItems_DocItem_DocItemKey,0)),IF(AND(ISBLANK(B2),LEN(C2)>0),"New",""))

This formula will display the word “New” on new Item rows on the worksheet. Those Items will be numbered correctly when they are imported onto the document.
-
- Use the following formula, where C2 is replaced by the first cell in your leftmost user input column and B2 is replaced by the DocItemKey column. (Use the scroll bar to see the whole formula.)
- Once you have the correct formula in row 2, drag and copy that formula down in your Item Number column for as many rows as you think you’ll need in your Spitfire document. Or, move to cell A1000 (to support 1000 rows) and give the cell the defined name To_RowLimit
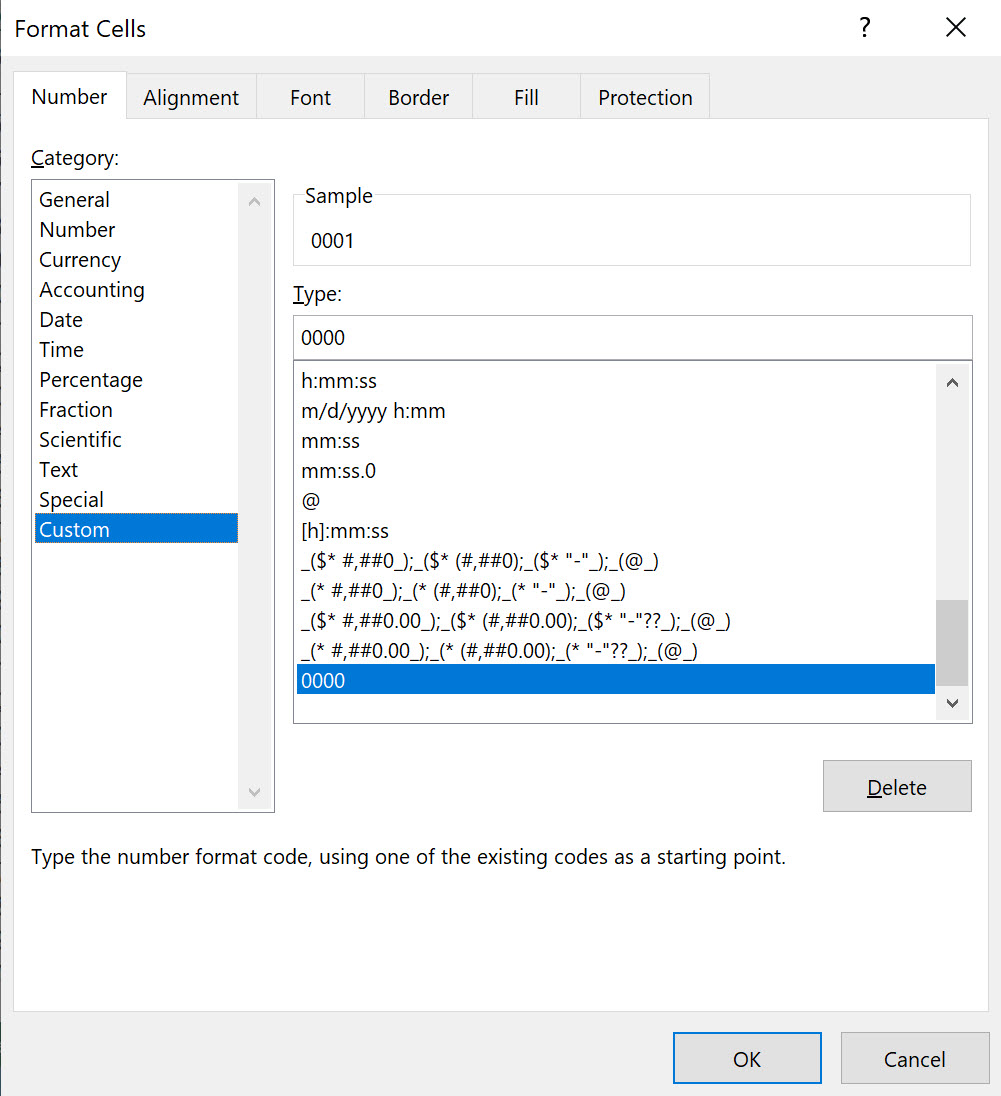
- Select the column and format the cells in that column with the appropriate formatting to match the formatting of the Item number. Since you want leading zeros, use a Custom formatting with the correct number of digits. For example, use 0000 to indicate 4 digits.
- Save and close Excel.
Changes in the Templates Tool:
- Once you have modified the template, upload it to your Template library. This template will be replacing the older template.
- Change the Template Type from Via XL for Doc Items to Attachment, Attachment (Auto) or Attachment (all). [For an explanation of the differences, see Attachment Type Templates.] The Data from Doc option should be checked.

- Change the Description if appropriate then save your changes.
Changes in Rules Maintenance:
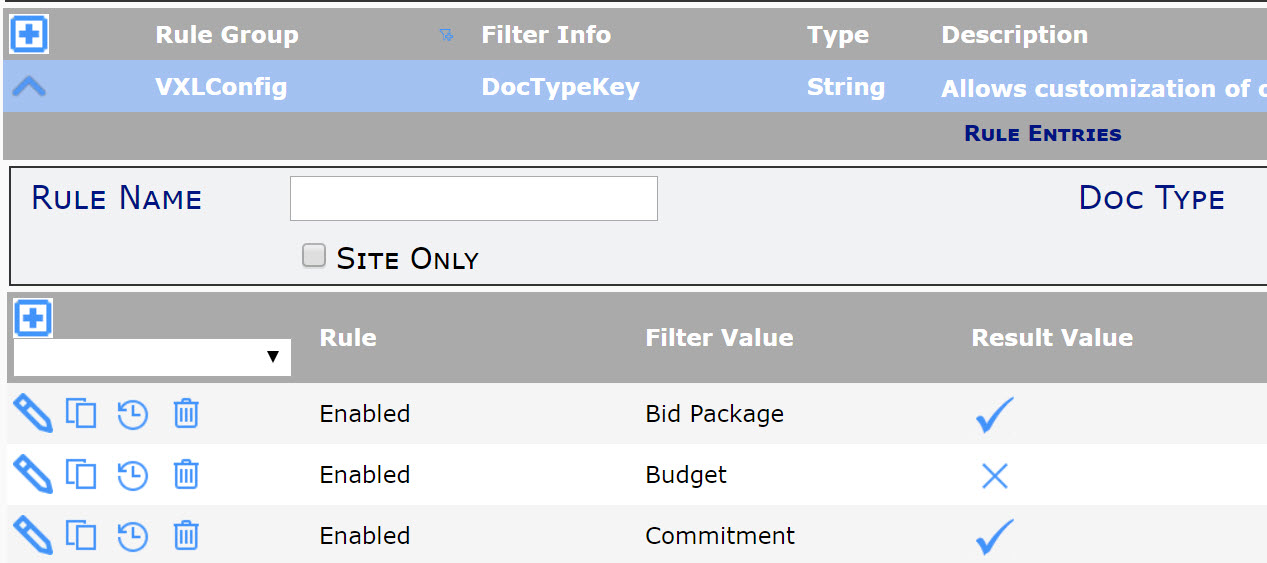
- Go the the VXLConfig rule group and expand it.
- If the Enabled rule is not there for your Doc type, add the rule with the checkmark. In the example below, import of Items is ON for Bid Packages and Commitments, but OFF for Budgets.
- If you would like to be able to “round-trip” your data (i.e., data that you enter in Excel shows up in your Items tab and data that you enter/change in the Items tab shows up in your Excel file, back and forth) also add the following ExportEnabled rule:

- You might also want to read about the ImportAutoLoad and ImportRecalc fields in KBA-01606 to see if you want to change their defaults.
- Save your changes. Your template is ready to use!
To use the template:
- Do NOT select the old Via Excel option.
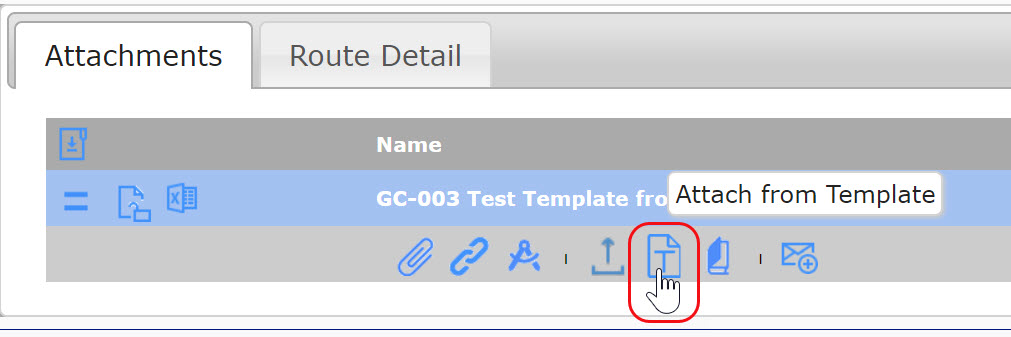
- Either attach the template file to the document through the icon or find the template file already attached on your document.
- Open the Excel file and enter your data. When you save and close Excel, the data will get copied to the Items tab on your document.
Finding Defined Name References
If you are using a version of Microsoft Office prior to 2016, all @DefinedNames used in our formulas above will need to be replaced by what they refer to, starting at row 2. In addition, if your Item numbers are configured to use a Doc number prefix (such as D-4), you’ll need to replace @zRawDoc_DocMasterDetail_DocNo in your formula with the reference (as shown in the picture for option C in the “Changes to Your Template” instructions above).
To find a Defined Name reference:
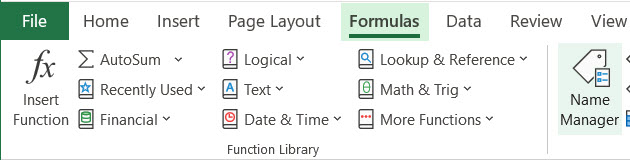
- While in your template in Microsoft Excel, select the Name Manager option on the Formulas ribbon.
- Scroll to find the @DefinedName mentioned in the formula, for example @zRawDoc_DocMasterDetail_DocNo.
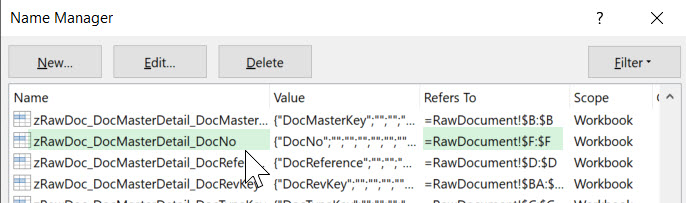
- Copy the Refers To to your formula making the following changes:
- Do not include the = sign
- Remove the colon (:) and everything after it
- Add $2 if the the Defined name begins with zRawDoc and just 2 if the Defined name begins with zRawItems
- For example,
=CONCAT(@zRawDoc_DoczMasterDetail_DocNo,
becomes
=CONCAT(RawDocument!$F$2,
KBA-01797; Last updated: October 30, 2024 at 12:18 pm Keywords: bi-directional Excel template