
To add rows manually:
- From the Budget ribbon click Add Rows. The Enter/Browse dialog will appear.

- In each Cost Code field, either click Browse or type codes.
- In Account Category select the corresponding category from the drop-down menu.
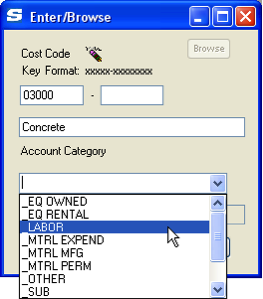
- Click Add.
Note: If the Cost Code is not valid, the Add button will be disabled.
The Data worksheet will now contain both a summary and a detail row for your Cost Code and Account category combination.

- Enter a Budget Amount for the detail row. Notice the cell in the Original EAC column has a green background indicating thus cell will accept direct input.
Note: If your Account Category is a Revenue Account Category, the Original Revenue Budget column cell will be active. Expenses are entered in the Original EAC column. Revenue amounts are optional, but, if entered, they are entered in the Original Revenue Budget column.

- Repeat steps 1-5 as necessary.
- When you have completed entry of the data, check the Revenue and Budget totals listed at the top of the columns to ensure you have entered your entire budget.

- Save your BFA workbook, close Excel, and return to the Spitfire Budget document.