
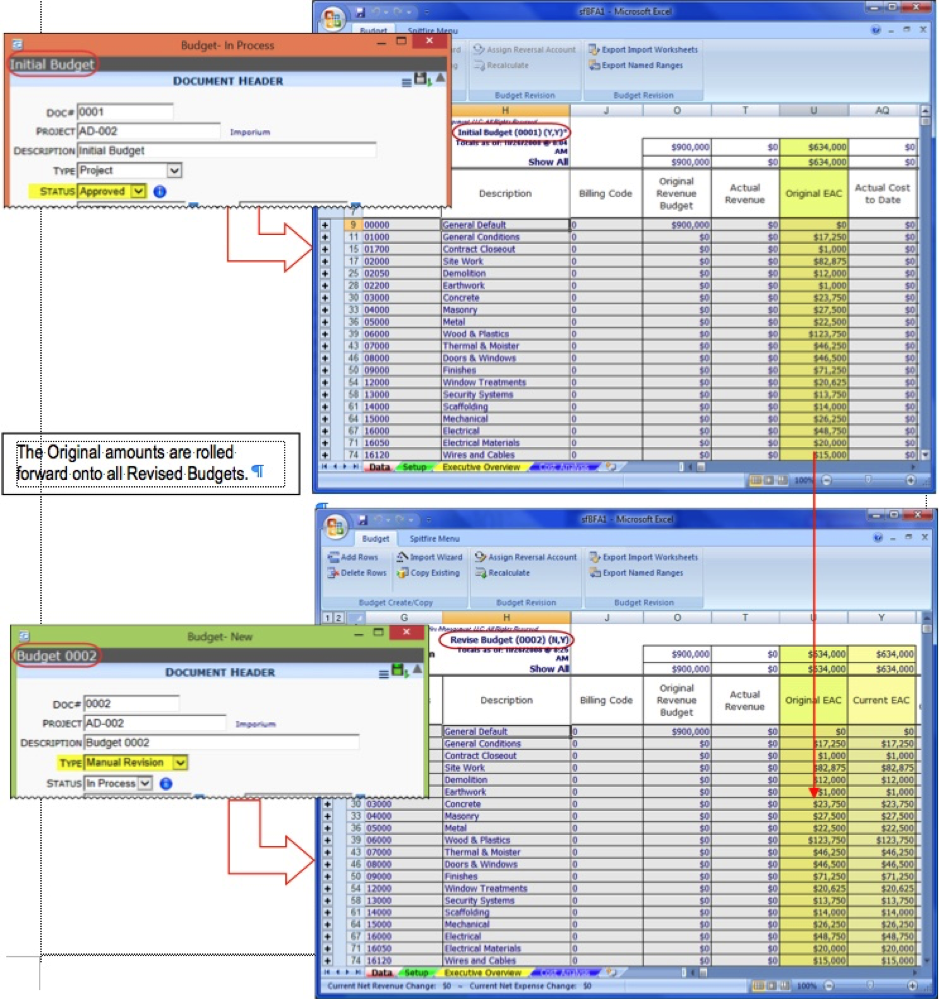
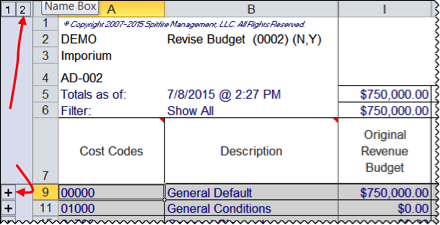
Once the status of the Initial Budget (or the As Bid Budget) document has been changed to Approved, the “Original Budget” amounts can no longer be edited. Revisions to the budget after that point are made through a new Budget document, which begins with data from the Original Budget (as shown below).
Your Initial Budget document is unique. Bu default the values you enter through the Initial Budget are posted to all three budget buckets: Original, EAC, and FAC. (You can chose to change this default.) Subsequent Budget documents will post budget revisions to the EAC bucket only.
Note: If you are using the As Bid Budget document as your first document, the values you enter through your first BFA workbook will be posted to the Original bucket only.
If you approve the Revised Budget (Budget #2), the next Budget document you create (Budget #3) will carry over the Revised Budget information (EAC), in addition to the Original budget information in the Original EAC column.
You can create any number of Revised Budgets; however, by default, a Revised Budget document cannot be created until the previous Budget document has been Approved. Each new Budget carries over all previously approved revisions.
Status Line
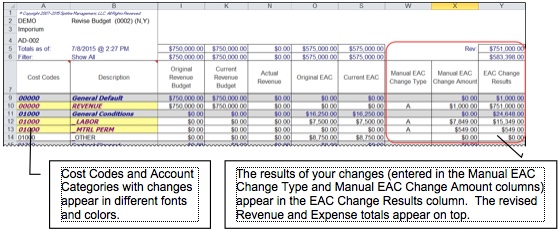
When you make changes to your data during Budget revisions, net revenue and expense changes are listed on the Status Line.

Fiscal Periods
On any Budget document you can specify the fiscal period into which the budget revision numbers should be posted. Once the Budget document as Approved, the month and year indicated on the Period field of the Budget document will used as the fiscal period.
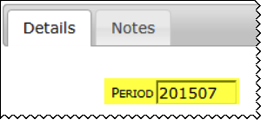
You can change what appears in the Period field to any year and month (YYYYMM) within the timeframe of January of last year through December of next year. For example, if it is currently November 2014, you could change the fiscal period to anytime between January 2013 (201301) and December 2015 (201512).
What appears in the Period field by default is determined by the DocTypeConfig | FiscalPeriod rule. (See KBA-01154 and the System Administrator Focus Guide for more information.)
To create a Revised Budget document and worksheet:
- From the Project Dashboard, create a new Budget document.
- (optional) From the Type drop-down list, select Manual Revision.
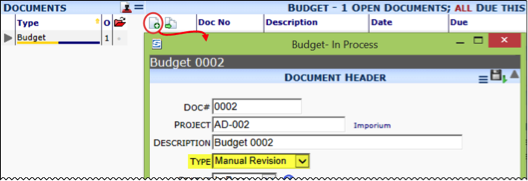
- (optional) Make changes to any of the fields in the document.
- Save the document is order to enable the Excel icon.
- Click the Excel icon to open the BFA workbook.
- In necessary ungroup your Cost Codes. Changes must be made at the Account Category level.
- (optional) Assign a Reversal Account if desired.
- At this point, you can use the Copy Existing option or the Import Wizard. You can also make manual changes directly in the worksheet. For each row you want to change manually:
– In the Manual EAC Change Type column, enter either an A (to add or subtract the amount to the existing amount) or an R (to replace the existing amount with a new amount).
Note: Depending on your Setup, one of these letters will appear by default in this column whenever you enter a change in the Manual EAC Change Amount column. If you know your default, you do not need to enter anything in the Manual EAC Change Type column.
– Enter your changed amount in the Manual EAC Change Amount column.
Note: If the Original Budget amount is 0 (zero) or if you want to replace an amount with 0, the Manual EAC Change Type is forced to be an A regardless of your input and the Manual EAC Change Amount is calculated and automatically entered to give you the end result you desired. For example, if the current amount is $100 and you entered R and 0 (because you want tp replace the $100 with $0), the Data worksheet would change the R to an A and the $0 to -$100.
– Tab out of the cell or click in another cell for the change to take effect.
- Add new rows if necessary.
- Close Excel. A Summary of Changes pop-up will confirm your changes.
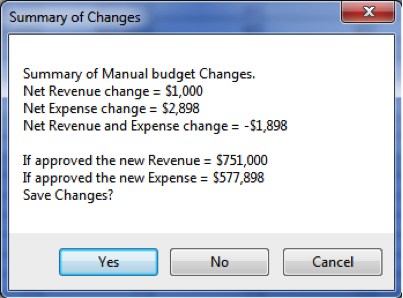
- Click Yes to save your revisions, close BFA, and return to the Spitfire Budget document (or click No to close BFA and return to the Spitfire Budget document without saving your changes).
- Back in the Budget document, attach supporting files if necessary.
- Route as appropriate.
- Save your Revised Budget document.
- As with the Initial Budget, you can open and change your Revised Budget and its BFA workbook as often as needed while the status is In Process. However, while the status id Pending, you will not be able to change the BFA workbook. Change the status back to In Process to make changes and change it to Approved when you are ready to post your revised numbers.
Adding Rows that Already Exist
When editing your Budget, you can use the Copy Existing and Import Wizard options described elsewhere. You can also use the Add Rows option as often as necessary. However, if you try to add Cost Codes and related Account Categories that already exist in the BFA workbook, the Similar Row Election window will appear.
Through Add Rows
If you are adding a Cost Code – Account Category row through the Add Row option, the following window will appear.
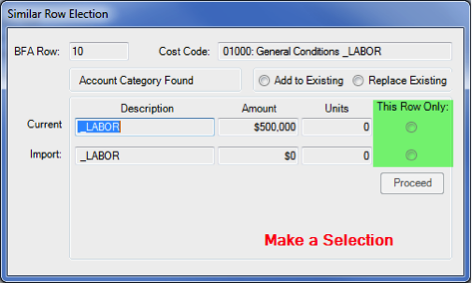
Note: Amounts and Units on the Account Category level and Units on the Cost Code level (if any) are indicated.
- If you want to keep the original row, select This Row Only: Current.
- If you want to use new data to change your row, select This Row Only: Import.
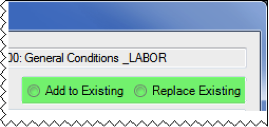
- If you want the new amount/units to replace the existing amount/units. select Replace Existing.
- If you want the new amount/units to be added to the existing amount/units, select Add to Existing.
Click Proceed.
Through Copy Existing or Import Wizard
If you are using the Copy Existing or Import Wizard option and there are duplicate Cost Codes and related Account Categories, the Similar Row Election window will have additional choices.
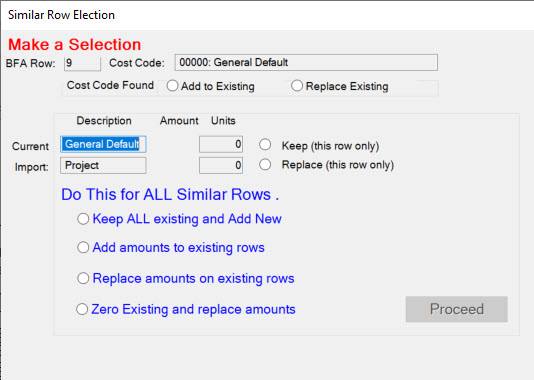
Remember, in all cases new rows are added with the amounts from the import. This dialog changes what happens when the target row already exists.
- If you do not want to make changes to any of the rows that are duplicated, select Keep ALL existing and Add New.
- If you want to add the imported amounts and units to the duplicate Account Category rows , select Add amounts to existing rows (and add new rows, of course)
- If you want to replace the amounts and units on all duplicate Account Category rows (and replace the units, if any, on all duplicate Cost Code rows), select Replace amounts on existing rows (and add new rows, of course)
- If you want to ZERO all existing rows and then import the amounts and units, select Zero Existing and replace amounts. Yes, this zero’s even rows not in the current import!
- Slower, but If you want to indicate how duplicate rows should be handled on a row-by-row basis, select either Add to Existing or Replace Existing for each duplicate row.
- Click Proceed.
Note: The Similar Row Election window appears whether you are modifying your Initial Budget or a Budget revision.
Revised Budgets from Other Documents
Change Order documents can revise your EAC budget, both expense and revenue lines.
Approved or Committed CCO documents and Committed Commitment documents can also revise your EAC budget.
You can chose whether you want these documents to revise your budget automatically and whether you want Budget revision documents to be Approved (posted) automatically or not.
When automatic budget revisions is enabled, changes to your budget can be seen thought Budget documents (and corresponding BFA workbooks) that are created on your Project Dashboard.