
Summary:
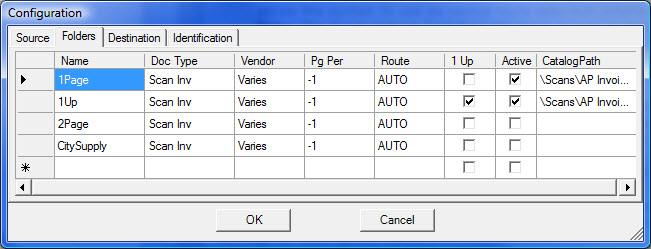
The Folder tab in the Batch Upload Tool‘s Configuration dialog box allows you to configure the following options:
- Set the folder Name from which you will upload your scanned files.
- Set the Doc type. This allows you to control the Doc type created by the Batch Upload Tool. Currently the Scanned Invoice (or AP Scans) is the most likely.
- Set the Vendor. This allows you to upload a batch of invoices for a specific Vendor to a specific Catalog folder.
- Set the Pages Per Invoice (0=separator sheets, -1=Use Default on Source tab, 1=one page per invoice, 2=two pages per invoice, etc.)
- Set the Route used on the new Spitfire document with your scanned files. AUTO is the default and allows the system to use its normal route selection criteria.
Note: The Batch Upload Tool does not have access to most of the conditions you normally use when building a default route. For example, if Project is not known, routing to the Project Manager is not possible. - Check 1UP to create a Spitfire document for each scanned file. This allows you to create a batch of Spitfire documents that can be routed to approvers prior to entry in Accounts Payable.
- Check Active to turn it On or Off. This allows you to create multiple scenarios and click them on or off as you load each batch of scanned files.
- Set the Catalog folder path where you would like to upload your scanned files.
It is possible to create multiple rows with different options for each of your upload folders. In addition, choosing the Active rows for your upload makes it quick and easy to switch your scanning settings for each upload session.
Additional Comments:
Note: All Active rows on the Folders tab and the folder indicated on the Source tab are processed when the Batch Upload Tool is run.See also KBA-01283
KBA-01272; Last updated: May 18, 2017 at 12:31 pm;