
Question
Is there an easy way to prepare an IIS server for sfPMS?
Answer
We require Windows 2022 or later.
“Hardware” Resources
In this day of virtualization, resources allocated to the IIS node are flexible. Here are our requirements:
| Minimum | Recommended | |
| Cores (at 2.5 Ghz or better) |
2 | 4 |
| GB of RAM | 12GB | 12-16 (can be dynamic) |
| Boot Drive – GB | 60 | 90 |
Recommendations are for an IIS node that services 20-30 concurrent users. As the number of users grows beyond 50, additional resources will certainly be required. You might start with a split of the ATC and ICTool components into a separate IIS node. Farm deployments are recommended for more than 60 users and certainly increase reliability and resilience.
Ask us about hosting your site on scalable AWS farms!
Using PowerShell
- Download the Role Deployment XML from the NewInstall resources folder, save the file in c:\spitfire\IIS-RoleDeployment.xml
- Open PowerShell as an Administrator
- Type (or paste) the following command to run the Install-WindowsFeature
Install-WindowsFeature -ConfigurationFilePath c:\spitfire\IIS-RoleDeployment.xml
- Repeat for IIS-RoleDeployment-WebSockets.xml or manually using the Add Roles and Features tool.
- Open ports for the ATC service
netsh advfirewall firewall add rule name = SFATC dir = in protocol = tcp action = allow localport = 14491-14492 remoteip = localsubnet profile = DOMAIN
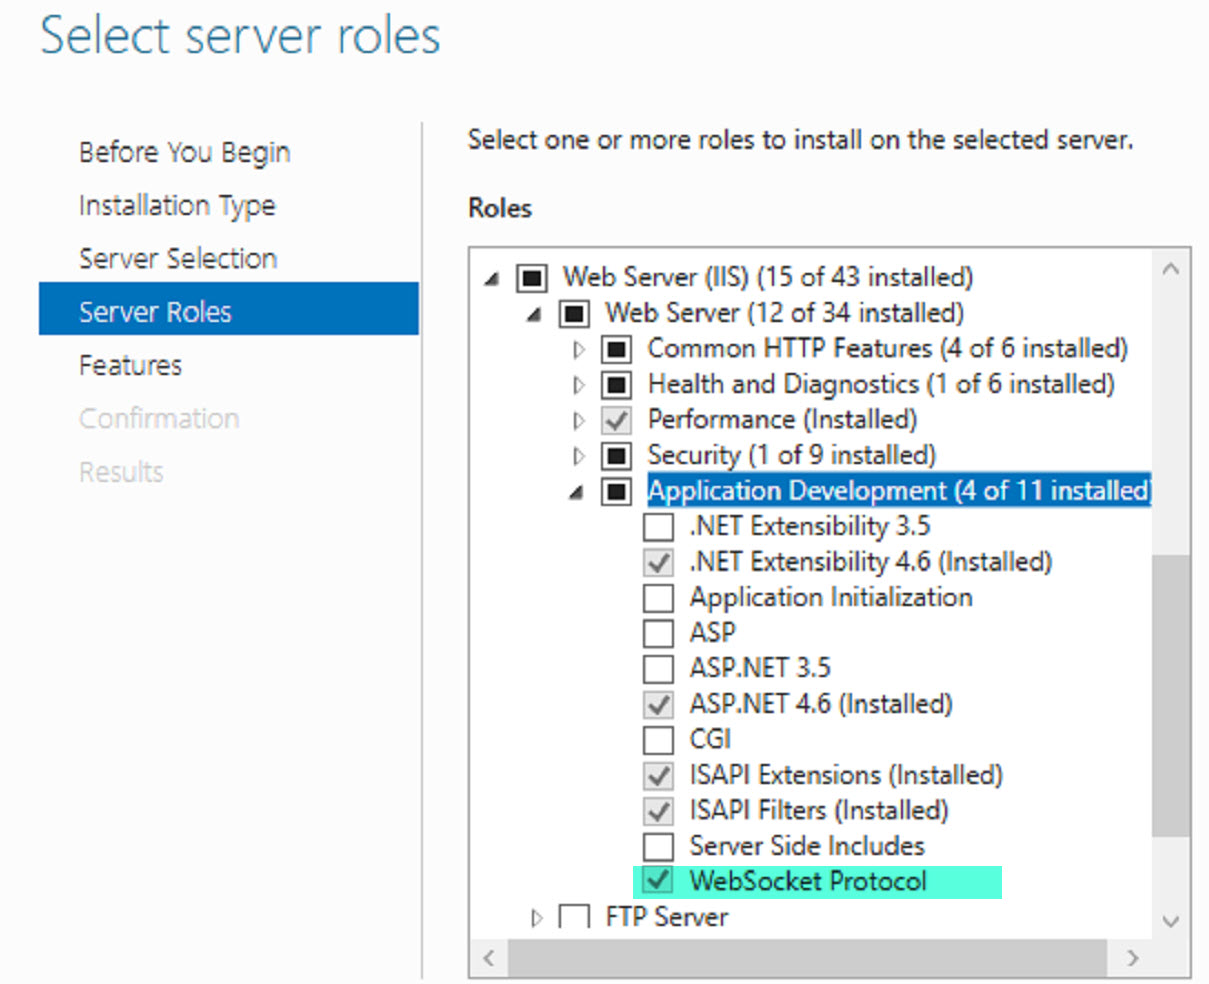
Manual Check List
- Install Chrome
- Download the Role Deployment and ICTool Setup from the NewInstall resources folder
- Follow the Using PowerShell steps above to apply the roles
- Run the ICTool Setup – you need Site and User Keys
- Run INETMGR and
- Create one or more application pools for the sfPMS application(s). Typically, don’t mix production and test sites in one pool. Name the pools something like SpitfireProductionPool and SpitfireTestPool. See below for recommended advanced settings.
- (optionally) add a website (Spitfire) mapped to c:\program files (x86)\Spitfire\websiteroot
- (optional) SSL certificate?
- Add (one or more) web applications mapped to c:\program files (x86)\Spitfire\webapproot\vr-xxxx and bind to hostname and (optionally) a local port
- If migrating from an older server
- Copy site configuration data from c:\program files (x86)\Spitfire subtree to the new server. Some important resources include:
- SiteConfig.XML
- Site signing key
- License (likely needs to be replaced if not a farm)
- Optional: Logo image (may be in web application root\images)
- Use NotePad++ to edit the configuration XML. Beginning with Build 9200, this file usually contains encrypted values. When you edit, you can replace the encrypted value with plain text. It will be re-encrypted for you.
- Find SQLSERVER and replace the old SQL server name with the new SQL name
- Find ATCHOST and replace the old ATC server name with the new name
- Find HostServerName, INTRAHOSTNAME, and FarmPoint.ServerName and replace with the new IIS name
- If the IIS Site number has changed, find IISSiteName and replace it (0 or 1 or 2)
- Copy site configuration data from c:\program files (x86)\Spitfire subtree to the new server. Some important resources include:
- Open ICTool (use File | Open to open the configuration file copied from a prior server)
- On the Servers tab, update the ATC server name if necessary
- For new installs, see the installation guide – setup SQL data, etc)
- On the sfPMS Members tab,
- update the server name and verify the VSPD path folders exist
- click in the web application column and lookup the IIS Web Application.
- consider if the hostname is changing
- On the ATC tab,
- verify the local HTTP path and local IP addresses
- install ATC
- install the service
- Create a firewall exemption for 14491 and 14492
netsh advfirewall firewall add rule name = SFATC dir = in protocol = tcp action = allow localport = 14491-14492 remoteip = localsubnet profile = DOMAIN - IMPORTANT: if you are preparing the new server and the old server is running, disable ATC on the new server for now!
- Obtain a license for the new server and place it into the InstallBase\data\SERVERNAME folder
- In Windows SERVICES.MSC
- set the ASPNET_STATE service to auto-start (and start the service)
- set the Spitfire ATC service to DELAYED start, with auto-recovery.
- Use “Local System Account” on the “Login As” tab. If you use AD credentials, use a domain-limited account, but also add the account to the local administrators group on this IIS server. If you use an AD user without local admin, the service will not automatically restart overnight, nor can it apply updates for the web application.
- Make sure the IIS and SQL server have the same time zone and the same time source. See KBA-01559
- Publish the site
- Open the site
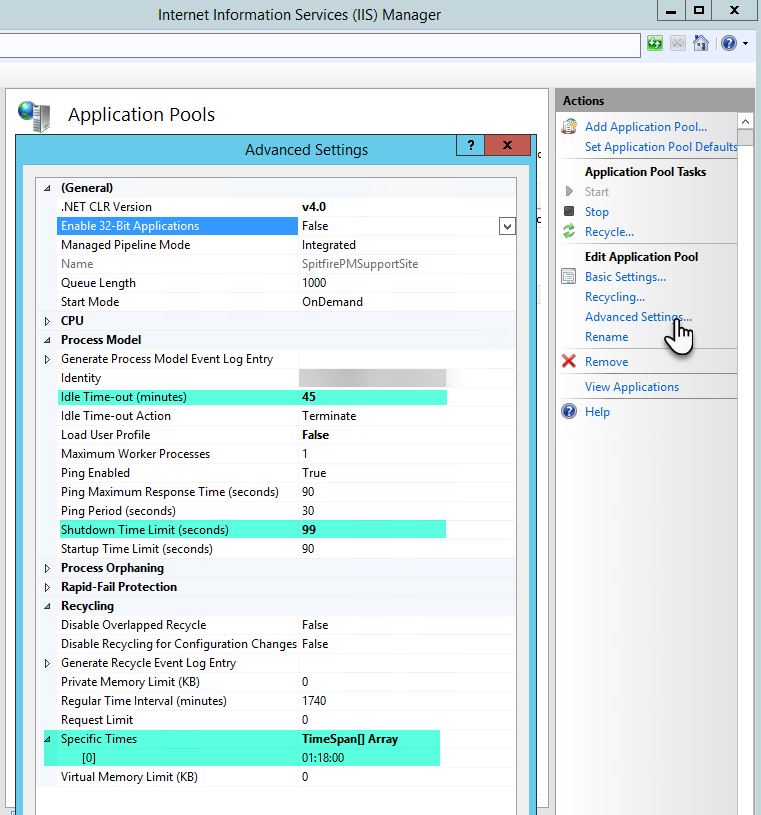
IIS Application Pool Advanced Settings
- Enable 32-bit applications: With Windows Server 2012 and later, we recommend false (which is the default).

- Idle Time-out Minutes: We recommend a value between 30 and 50 (default is 20).
- Shutdown Time Limit: We recommend a value between 99 and your PDS RAM cache time (often 123).
- Specific Times: We recommend something between 1 and 3 AM. You should specify at least one time during off-hours; otherwise your application pool will recycle daily at whatever time IIS decides. The UI seems to support seconds, but you must use 00 for seconds (minutes are okay).
- Virtual Memory Limit: Should be zero
KBA-01651; Last updated: March 18, 2025 at 11:29 am Setup IIS